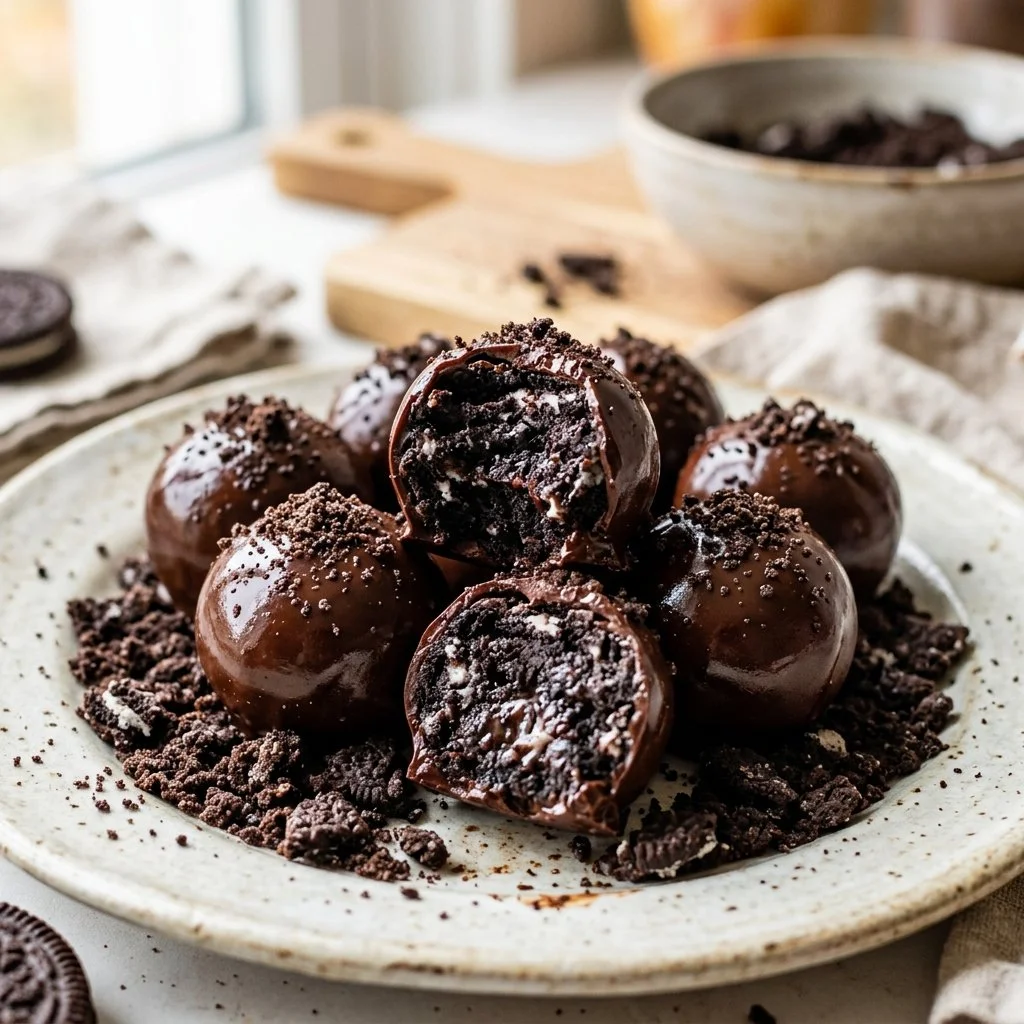
There’s something about Oreo Balls that transports me back to carefree childhood days, gathering around the kitchen table with my siblings, laughter filling the air as we teamed up to create something sweet from simple ingredients. The satisfaction of turning crunchy chocolate cookies and creamy goodness into bite-sized treats is truly one of life’s little joys. These delicious bites aren’t just for kids; they’re an irresistible delight for grown-ups too, making them perfect for gatherings, celebrations, or even a cozy night in with your favorite movie.
Recipe Timing
- Prep Duration: 15 minutes
- Active Cooking: 15 minutes
- Total Duration: 1 hour 15 minutes (including freezing time)
- Portion Size: About 24 Oreo Balls
- Complexity: Simple
Nutritional Recipe
- Calories per portion: Approximately 100 calories
- Protein: 1g per serving
- Carbs: 10g per serving
- Fats: 7g per serving
- Fiber: 0g per serving
- Sugars: 5g per serving
- Sodium: 90mg per serving
Why You’ll Love This Oreo Balls
These Oreo Balls are not just a sweet treat; they embody comfort and nostalgia. With each bite, you’ll experience a delightful crunch mingling with a smooth, creamy center, all enveloped in luscious chocolate. Whether you need a quick dessert for a last-minute gathering or a fun project to do with the kids, these treats check all the boxes. Plus, they’re endlessly customizable—be it sprinkles, crushed Oreos, or different types of chocolate—as you put your personal touch on each batch!
The Complete Cooking Journey
Creating Oreo Balls is a breeze, making it a fun option for any skill level in the kitchen. Let’s walk through this delicious journey of flavors and textures.
Ingredients:
- 1 package Oreo cookies (approximately 36 cookies)
- 8 oz cream cheese, softened
- Chocolate coating (milk or dark, according to your preference)
- Sprinkles or additional crushed Oreos for decoration (optional)
Method:
Step 1: Crushing the Cookies
Start by crushing the Oreo cookies into fine crumbs in a bowl. Use a food processor for ease, or place them in a resealable bag and roll over them with a rolling pin to achieve that perfect crumbly texture.
Step 2: Mixing the Creaminess
In a separate bowl, mix the crushed Oreos with the softened cream cheese until completely combined. You’ll know it’s ready when the mixture is a uniform dark color. This is where your kitchen will start to smell divine!
Step 3: Rolling into Balls
Roll the mixture into small balls, roughly the size of a tablespoon, and place them on a baking sheet lined with parchment paper. Don’t worry about making them perfect; the homemade charm is all part of their appeal!
Step 4: Freezing for Firmness
Pop your baking sheet into the freezer for about 30 minutes to allow the balls to firm up. This step is crucial to ensure that they hold their shape during the dipping process.
Step 5: Melting the Chocolate
While those delightful orbs are firming up, melt your chocolate coating in a microwave-safe bowl or a double boiler. If using a microwave, heat in short bursts, stirring in between, until smooth and glossy.
Step 6: Dipping into Chocolate
Once your Oreo balls are firm, it’s time for the fun! Dip each frozen ball into the melted chocolate, ensuring it’s fully coated. Use a fork to lift it out, letting the excess chocolate drip off before placing it back on the baking sheet.
Step 7: Decorating Delightfully
If you’re feeling creative, this is the moment to decorate! Sprinkle some colorful sprinkles or additional crushed Oreos on top of the chocolate before it sets to add a touch of flair to your treats.
Step 8: Setting Up for Enjoyment
Finally, let the chocolate set completely before enjoying your Oreo Balls. You can place them in the refrigerator to speed up this process.
Serving Suggestions & Pairings
Oreo Balls are perfect on their own, but why not elevate the experience? Serve them alongside a tall glass of cold milk or a scoop of vanilla ice cream for a dreamy dessert pairing. They also make delightful gifts when presented in a cute box or jar, making them a perfect gesture for friends or loved ones.
Storage & Leftovers Guide
Store any extras in an airtight container in the refrigerator for up to a week (if they last that long!). You can also freeze them for extended storage—just allow them to thaw in the refrigerator before serving.
Kitchen Wisdom & Success Tips
- Ensure your cream cheese is at room temperature for easy mixing.
- Don’t rush the chilling process; freezing the balls helps maintain their shape.
- Feel free to use different types of chocolate coatings—white chocolate adds a lovely sweetness!
Flavor Variations & Adaptations
Get creative! Try using flavored cream cheese, like strawberry or chocolate, for a twist. You could also experiment with different cookie types—imagine making these with mint Oreos or peanut butter flavor!
Reader Questions & Solutions
-
Can I use low-fat cream cheese?
Yes, low-fat cream cheese works, but the texture may be slightly different. -
What if I can’t find Oreo cookies?
Any chocolate cookie can work—just be sure they are sturdy enough to hold their shape. -
How can I fix melted chocolate?
If your chocolate gets too thick, add a bit of coconut oil or vegetable shortening to thin it out. -
Can I add flavors to the mixture?
Absolutely! A teaspoon of vanilla extract or a dash of peppermint flavor can elevate these treats. -
What’s the best way to transport them?
Place them in a single layer in an airtight container for travel to prevent them from sticking together.
Wrapping Up
Creating these delightful Oreo Balls brings joy not just in the making but also in sharing them with friends and family. Each bite is a nostalgic reminder of simpler times, sweetened with the pleasure of chocolate and cream. So gather your ingredients, roll up your sleeves, and start your delicious journey today! Trust me, once you make them, you’ll want these little bites of happiness in your kitchen all the time!
PrintOreo Balls

Delicious Oreo Balls made from crushed cookies and cream cheese, coated in chocolate—perfect for any gathering!
- Prep Time: 15 minutes
- Cook Time: 15 minutes
- Total Time: 75 minutes
- Yield: 24 Oreo Balls 1x
- Category: Dessert
- Method: No-Bake
- Cuisine: American
- Diet: Vegetarian
Ingredients
- 1 package Oreo cookies (approximately 36 cookies)
- 8 oz cream cheese, softened
- Chocolate coating (milk or dark, according to your preference)
- Sprinkles or additional crushed Oreos for decoration (optional)
Instructions
- Start by crushing the Oreo cookies into fine crumbs in a bowl.
- In a separate bowl, mix the crushed Oreos with the softened cream cheese until completely combined.
- Roll the mixture into small balls, roughly the size of a tablespoon.
- Pop your baking sheet into the freezer for about 30 minutes to allow the balls to firm up.
- While those delightful orbs are firming up, melt your chocolate coating in a microwave-safe bowl.
- Once your Oreo balls are firm, it’s time for the fun! Dip each frozen ball into the melted chocolate.
- If you’re feeling creative, this is the moment to decorate!
- Finally, let the chocolate set completely before enjoying your Oreo Balls.
Notes
Store extras in an airtight container in the refrigerator for up to a week. They can also be frozen for extended storage.
Nutrition
- Serving Size: 1 ball
- Calories: 100
- Sugar: 5g
- Sodium: 90mg
- Fat: 7g
- Saturated Fat: 3g
- Unsaturated Fat: 3g
- Trans Fat: 0g
- Carbohydrates: 10g
- Fiber: 0g
- Protein: 1g
- Cholesterol: 15mg