There’s something truly magical about pickling. The way it transforms ordinary ingredients into zesty, flavorful treats is a kitchen miracle I adore. My love affair with pickled garlic started during a kitchen experiment where I was trying to add some pizzazz to our family dinners. One particularly memorable night, I had an abundance of garlic cloves and a yearning for something bold. A friend suggested pickling, and with just a few simple ingredients, I was on the verge of culinary discovery. The resulting pickled garlic became a staple in our home—topping salads, amplifying sauces, and standing proudly next to cheese platters. Let me take you on this delightful journey into the world of pickled garlic.
Recipe Timing
- Prep Duration: 10 minutes
- Active Cooking: 5 minutes
- Total Duration: 35 minutes (plus refrigeration time)
- Portion Size: 1 cup (approximately 8 servings)
- Complexity: Simple
Nutritional Recipe
- Calories per portion: 15
- Protein: 0g
- Carbs: 3g
- Fats: 0g
- Fiber: 0g
- Sugars: 1g
- Sodium: 200mg
Why You’ll Love This Pickled Garlic
Pickled garlic is not just a delicious addition to your pantry; it’s a game changer for any meal. With its sharp yet mellow flavor, it can enhance everything from appetizers to main dishes, offering a tangy bite that’s surprisingly addictive. And the best part? This recipe is incredibly simple, requiring just a handful of pantry staples. Whether you love experimenting with flavors or are simply looking for a way to jazz up your garlic game, this pickled garlic is bound to become a culinary favorite.
The Complete Cooking Journey
The beauty of pickling lies in its simplicity, and this pickled garlic recipe stands as a testament to that. The crunchy garlic cloves absorb the tang from the vinegar and mellowness from the sugar and salt, creating a symphony of flavors that dance on your taste buds. It’s a recipe you can whip up in no time, but patience will reward you with deliciously transformed garlic after a day in the fridge.
Ingredients
- 1 cup garlic cloves
- 1 cup distilled white vinegar
- 1/2 cup water
- 1 tablespoon salt
- 1 tablespoon sugar
- 1 teaspoon black peppercorns
- 1 teaspoon mustard seeds
Method
Step 1: Peel the Garlic Cloves
Start by peeling the garlic cloves and setting them aside. This step might feel a bit tedious, but trust me, a little elbow grease will lead to vibrant flavors later on!
Step 2: Combine the Pickling Mix
In a saucepan, combine the distilled white vinegar, water, salt, and sugar. Bring this mixture to a boil over medium heat, stirring to ensure the salt and sugar dissolve completely.
Step 3: Add Garlic and Spices
Once the pickling mixture reaches a rolling boil, add the peeled garlic cloves, along with the black peppercorns and mustard seeds. This is where the magic begins—your kitchen will soon be filled with enticing aromas.
Step 4: Cool Down the Mixture
After adding the garlic, remove the saucepan from heat. Let the mixture cool for about 10 minutes. This cooling period allows the garlic to begin absorbing those vibrant flavors.
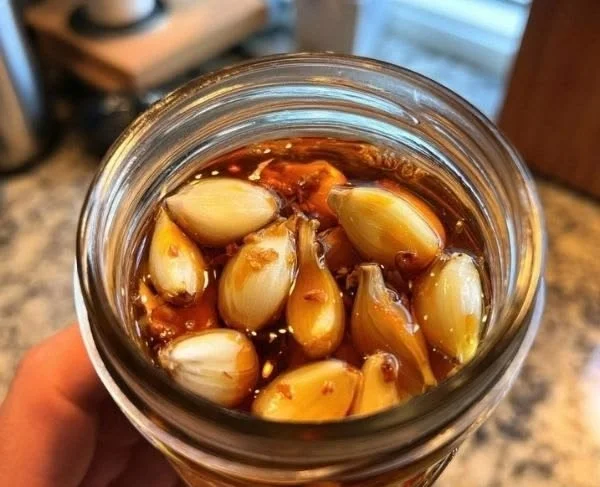
Step 5: Transfer to a Jar
Carefully transfer the cooled garlic and pickling liquid into a clean jar. Make sure to seal it tightly; this will preserve all those beautiful flavors we just created.
Step 6: Refrigerate and Wait
Now, for the hardest part: waiting! Refrigerate the jar for at least 24 hours before using. This resting period allows the flavors to meld beautifully, ensuring that each clove is packed with a delightful tang.
Serving Suggestions & Pairings
Pickled garlic is versatile and can be enjoyed in numerous ways. Serve it as a tangy topping on burgers, toss it into salads for an extra punch, or add it to your charcuterie board for an eye-catching twist. You’ll also find it a magnificent companion to cheeses, roasted meats, or tossed in pasta dishes for added zest.
Storage & Leftovers Guide
Once you’ve made this vibrant garlic treat, store it in the refrigerator. It will last up to two months, becoming even more flavorful as it sits. Just be sure to use a clean utensil each time to keep your pickled garlic fresh.
Kitchen Wisdom & Success Tips
- To achieve a milder flavor, you can reduce the pickling time; enjoy the garlic with just one day of resting.
- If you’re looking for extra heat, adding red pepper flakes to your pickling mixture gives it a delightful kick.
- Always ensure your jar and utensils are clean to prevent spoilage.
Flavor Variations & Adaptations
Feel free to experiment with additional herbs and spices! Dill, bay leaves, or even a hint of citrus zest can elevate the basic recipe into something uniquely yours.
Reader Questions & Solutions
-
Q: Can I use other types of vinegar?
A: Absolutely! While white vinegar offers a straightforward tang, apple cider vinegar or rice vinegar can impart unique flavor notes. -
Q: What if I don’t have mustard seeds?
A: No worries! You can leave them out or substitute with other seeds like coriander for a different taste. -
Q: How do I know when my pickled garlic is ready?
A: Trust your taste buds! After 24 hours, sample a clove to see if the flavor is to your liking. The longer it sits, the stronger the flavor. -
Q: Can I pickle garlic with other vegetables?
A: Yes! Pickling garlic alongside carrots or radishes can create a flavorful medley. -
Q: Why do the cloves turn purple?
A: This can happen if fresh garlic cloves have a low pH. It’s harmless and doesn’t affect the taste.
Wrapping Up
I hope you feel inspired to dive into the world of pickling with this simple yet flavorful pickled garlic recipe! There’s a certain joy found in transforming humble ingredients into culinary delights. Embrace the process, savor the flavors, and remember—the best meals often come from the simplest recipes. Your kitchen adventures await, so grab those cloves and enjoy the journey! Happy cooking!
PrintPickled Garlic
Transform ordinary garlic cloves into zesty, flavorful pickles with this simple recipe. Perfect for enhancing a variety of dishes.
- Prep Time: 10 minutes
- Cook Time: 5 minutes
- Total Time: 35 minutes
- Yield: 8 servings 1x
- Category: Condiment
- Method: Pickling
- Cuisine: Global
- Diet: Vegan
Ingredients
- 1 cup garlic cloves
- 1 cup distilled white vinegar
- 1/2 cup water
- 1 tablespoon salt
- 1 tablespoon sugar
- 1 teaspoon black peppercorns
- 1 teaspoon mustard seeds
Instructions
- Peel the garlic cloves and set aside.
- Combine the distilled white vinegar, water, salt, and sugar in a saucepan and bring to a boil.
- Add the peeled garlic cloves, black peppercorns, and mustard seeds to the boiling mixture.
- Cool the mixture for about 10 minutes.
- Transfer the garlic and pickling liquid into a clean jar and seal tightly.
- Refrigerate for at least 24 hours before using.
Notes
Store in the refrigerator for up to two months, using a clean utensil each time to maintain freshness.
Nutrition
- Serving Size: 1 clove
- Calories: 15
- Sugar: 1g
- Sodium: 200mg
- Fat: 0g
- Saturated Fat: 0g
- Unsaturated Fat: 0g
- Trans Fat: 0g
- Carbohydrates: 3g
- Fiber: 0g
- Protein: 0g
- Cholesterol: 0mg