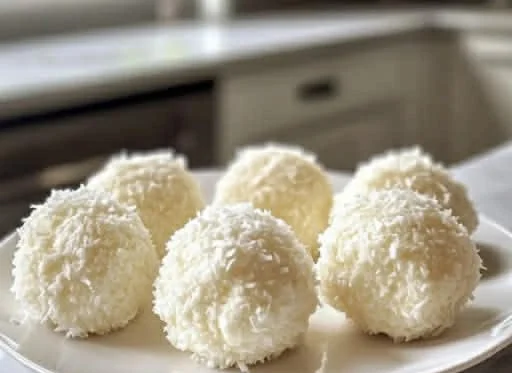
When it comes to celebrating Easter, nothing encapsulates the joy and whimsy of the season quite like a fun, delicious treat. This year, I decided to bring some extra cheer to my family’s festivities with a delightful creation: Easter Bunny Coconut Tails. These no-bake treats are beautifully simple to make, embodying the spirit of Easter with their playful appearance and sweet, coconutty flavor. I still remember the first time I bit into one of these delights—soft, creamy, and utterly satisfying.
As I watched my children’s faces light up with excitement, I knew I had struck gold! This recipe has quickly woven itself into our family traditions, and I can’t wait for you to create this magic in your own home.
Recipe Timing
- Prep Duration: 20 minutes
- Active Cooking: 0 minutes (it’s no-bake!)
- Total Duration: 20 minutes (plus chilling time)
- Portion Size: Approximately 24 treats
- Complexity: Simple
Nutritional Recipe
- Calories per portion: 120
- Protein: 1g
- Carbs: 18g
- Fats: 6g
- Fiber: 1g
- Sugars: 15g
- Sodium: 25mg
Why You’ll Love This Easter Bunny Coconut Tails: Delightful No-Bake Treats to Share
These coconut tails are the perfect blend of texture and flavor. Imagine biting into a creamy center surrounded by the texture of lightly toasted coconut. Not only are they adorable and reminiscent of Easter bunnies, but they also come together without any baking required! They’re perfect for involving the kids in the kitchen too. Plus, they add a touch of charm to your Easter gathering, making them ideal for sharing and celebrating.
The Complete Cooking Journey
Creating these treats is an experience in itself; from the excitement of gathering ingredients to the adorable final presentation, every step is a potential favorite moment. As you mix, mold, and dip, you’ll find yourself not just cooking but crafting memories.
Ingredients:
- 3 cups sweetened shredded coconut (opt for fine coconut for smoother truffles)
- 1 can sweetened condensed milk (essential binder; no substitutions advised)
- 1 teaspoon vanilla extract (can swap with almond extract for a twist)
- 1 pinch salt (enhances overall flavor)
- 2 cups white candy melts or white chocolate (use oil-based or gel food coloring to avoid seizing)
Method:
Step 1: Preparing the Coconut Mixture
In a large mixing bowl, combine the sweetened shredded coconut, sweetened condensed milk, vanilla extract, and a pinch of salt. Stir everything together until the mixture is well combined and sticky.
Step 2: Molding the Tails
Using your hands, grab small portions of the mixture and roll them into tail-shaped forms, about 1.5 inches long. Place the shaped tails on a parchment-lined baking sheet.
Step 3: Chilling the Mixture
Pop the baking sheet into the refrigerator for about 30 minutes to let the tails firm up. This step helps them hold their shape better when dipped in chocolate.
Step 4: Melting the Candy Coating
While the tails chill, prepare the candy melts or white chocolate. Melt them in a microwave-safe bowl at 30-second intervals, stirring in between until smooth. Be careful not to overheat, as it can seize up!
Step 5: Dipping the Tails
Once the tails are chilled and the coating is melted, take each coconut tail and dip it halfway into the melted chocolate. Let any excess chocolate drip off before placing it back on the parchment paper.
Step 6: Adding Finishing Touches
If you’d like, add sprinkles or colored sugar while the chocolate is still wet for a festive touch. Allow the chocolate to set at room temperature or in the fridge.
Step 7: Serve and Enjoy
Once the chocolate is completely set, your delightful Easter Bunny Coconut Tails are ready to be shared! Arrange them on a platter and watch your guests’ faces light up with delight.
Serving Suggestions & Pairings
These charming treats pair wonderfully with fresh fruit, like strawberries or pineapple, and a refreshing mint tea. For a more festive touch, serve alongside decorated Easter cookies or homemade chocolate bunnies!
Storage & Leftovers Guide
Store any leftover coconut tails in an airtight container in the refrigerator. They should stay fresh for about a week—if they last that long!
Kitchen Wisdom & Success Tips
- If you find your mixture is too sticky to shape, lightly wet your hands with water or a tiny bit of cooking spray to help with molding.
- Try setting them into different shapes! Using cookie molds can add a special touch.
- Make sure not to overheat your chocolate; a double boiler can also be a great method if you’re concerned about seizing.
Flavor Variations & Adaptations
Feeling adventurous? Experiment with different extracts, such as coconut or hazelnut. You can also mix in mini chocolate chips or dried fruit into the coconut mixture for a twist on flavor and texture.
Reader Questions & Solutions
- What if my chocolate seized up? You can sometimes salvage it by stirring in a small amount of hot vegetable oil—just a teaspoon at a time.
- Can I use dark chocolate instead? Absolutely! Dark chocolate will give a lovely contrast to the sweetness of the coconut.
- What if I don’t have sweetened condensed milk? Unfortunately, it’s the binder for this recipe, so it’s best to use it. However, you can check for alternatives online for other recipes.
- How do I color the white chocolate? Make sure you use oil-based or gel food coloring to avoid seizing the chocolate when adding color.
- How can I adjust this recipe for dietary restrictions? You can substitute the candy melts for dairy-free chocolate and ensure the condensed milk is coconut or almond-based for a vegan option!
Wrapping Up
Creating Easter Bunny Coconut Tails is not just about the delicious treats you’ll share but also about the memories you’ll create along the way. This recipe invites warmth, laughter, and the joy of celebration into your kitchen. Gather your loved ones, whip up these delightful no-bake treats, and let’s make this Easter one to remember! Happy cooking! 🌼🥥🐰
PrintEaster Bunny Coconut Tails
Delightful no-bake treats resembling Easter bunnies, combining sweet coconut and white chocolate for a whimsical seasonal dessert.
- Prep Time: 20 minutes
- Cook Time: 0 minutes
- Total Time: 20 minutes
- Yield: 24 servings 1x
- Category: Dessert
- Method: No-Bake
- Cuisine: American
- Diet: Vegetarian
Ingredients
- 3 cups sweetened shredded coconut
- 1 can sweetened condensed milk
- 1 teaspoon vanilla extract
- 1 pinch salt
- 2 cups white candy melts or white chocolate
Instructions
- In a large mixing bowl, combine the sweetened shredded coconut, sweetened condensed milk, vanilla extract, and a pinch of salt. Stir everything together until the mixture is well combined and sticky.
- Using your hands, grab small portions of the mixture and roll them into tail-shaped forms, about 1.5 inches long. Place the shaped tails on a parchment-lined baking sheet.
- Pop the baking sheet into the refrigerator for about 30 minutes to let the tails firm up.
- While the tails chill, prepare the candy melts or white chocolate. Melt them in a microwave-safe bowl at 30-second intervals, stirring in between until smooth.
- Once the tails are chilled and the coating is melted, take each coconut tail and dip it halfway into the melted chocolate.
- If you’d like, add sprinkles or colored sugar while the chocolate is still wet. Allow the chocolate to set at room temperature or in the fridge.
- Once the chocolate is completely set, your delightful Easter Bunny Coconut Tails are ready to be shared!
Notes
If the mixture is too sticky to shape, lightly wet your hands with water or cooking spray for easier molding.
Nutrition
- Serving Size: 1 treat
- Calories: 120
- Sugar: 15g
- Sodium: 25mg
- Fat: 6g
- Saturated Fat: 5g
- Unsaturated Fat: 1g
- Trans Fat: 0g
- Carbohydrates: 18g
- Fiber: 1g
- Protein: 1g
- Cholesterol: 0mg