There’s something magical about homemade treats that take you back to your childhood, and for me, Butterfinger Balls hold a special place in my heart. Growing up, my grandma would whip up batches of them for family gatherings, and the simple joy of biting into those sweet and crunchy delights was unparalleled. The creamy peanut butter combined with chocolate and the crunchy bits of Butterfinger bars created a heavenly snack that was always the highlight of the dessert table. Now, I find myself making them for my kids, continuing the tradition, and passing down the love for these delectable bites.
Recipe Timing
- Prep Duration: 15 minutes
- Active Cooking: 10 minutes
- Total Duration: 25 minutes
- Portion Size: About 24 balls
- Complexity: Simple
Nutritional Recipe
- Calories per portion: 160
- Protein: 3g per serving
- Carbs: 22g per serving
- Fats: 7g per serving
- Fiber: 1g per serving
- Sugars: 15g per serving
- Sodium: 90mg per serving
Why You’ll Love This Homemade Butterfinger Balls
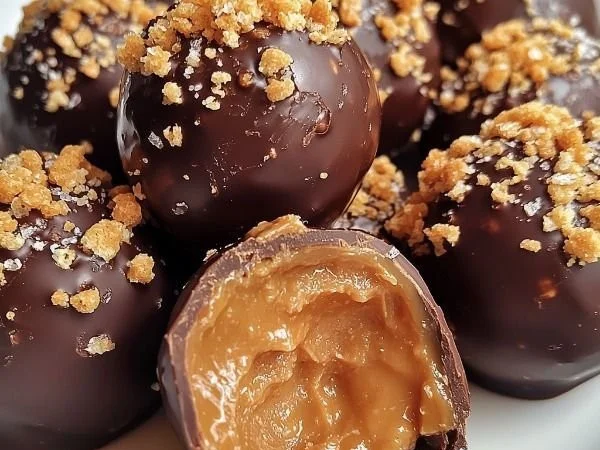
These Homemade Butterfinger Balls are not only incredibly delicious, but they also come together in just a few easy steps. The combination of creamy peanut butter and sweet powdered sugar creates a luscious filling, while the crushed Butterfingers add a delightful crunch that complements the smooth chocolate coating. Whether you’re hosting a gathering, looking for a quick treat for the kids, or simply indulging your own sweet tooth, these little bites are sure to impress and leave everyone wanting more. Plus, they require no baking—making them a perfect easy-to-make dessert!
The Complete Cooking Journey
Picture this: You walk into your kitchen, a sense of excitement bubbling within you as the ingredients for Butterfinger Balls await on the counter. You’re only moments away from creating a happy little snack that will infuse joy into your day.
Step 1: Combine Peanut Butter and Powdered Sugar
In a medium bowl, combine the creamy peanut butter and powdered sugar until smooth. This should be a fluffy mix that hints at the delightful sweetness to come.
Step 2: Fold in Crushed Butterfinger Pieces
Then, fold in the crushed Butterfinger pieces. As you mix, you’ll hear a satisfying crunch, teasing your taste buds with the promise of what’s about to emerge.
Step 3: Roll into Small Balls
Next, roll the mixture into small balls and place them on a baking sheet lined with parchment paper. Make them bite-sized for easy enjoyment—after all, no one can eat just one!
Step 4: Melt Chocolate Chips and Butter
In a microwave-safe bowl, melt the chocolate chips and butter together. Stir occasionally until the mixture is smooth and glossy. This rich chocolate coating will be the crowning glory of your creations!
Step 5: Dip Each Ball
Now comes the fun part—dip each ball into the melted chocolate, ensuring it’s completely coated. Watching the chocolate envelop the sweet, crunchy peanut butter ball is truly a delight.
Step 6: Allow to Set
Return the coated balls to the baking sheet and allow them to set until the chocolate hardens. This might be the hardest part—waiting for the irresistible aroma to fill the air!
Step 7: Enjoy Your Homemade Butterfinger Balls!
Finally, it’s time to dig in. Enjoy your homemade Butterfinger Balls and don’t forget to share them… or not!
Ingredients:
- 1 cup creamy peanut butter
- 1 cup powdered sugar
- 1 cup crushed Butterfinger candy bars
- 1 cup chocolate chips
- 1 tablespoon butter
Method:
Step 1: Combine Peanut Butter and Powdered Sugar
In a medium bowl, combine the creamy peanut butter and powdered sugar until smooth.
Step 2: Fold in Crushed Butterfinger Pieces
Fold in the crushed Butterfinger pieces.
Step 3: Roll into Small Balls
Roll the mixture into small balls and place them on a baking sheet lined with parchment paper.
Step 4: Melt Chocolate Chips and Butter
In a microwave-safe bowl, melt the chocolate chips and butter together, stirring until smooth.
Step 5: Dip Each Ball
Dip each ball into the melted chocolate, ensuring it’s completely coated.
Step 6: Allow to Set
Return the coated balls to the baking sheet and allow them to set until the chocolate hardens.
Step 7: Enjoy Your Homemade Butterfinger Balls!
Enjoy your homemade Butterfinger Balls!
Serving Suggestions & Pairings
These delicious treats stand out on their own but can also be paired with a cold glass of milk or a warm cup of coffee for the perfect balance. They make excellent party snacks, sweet additions to lunchboxes, or whimsical goodies to brighten someone’s day.
Storage & Leftovers Guide
Store leftover Butterfinger Balls in an airtight container in the refrigerator for up to a week. For longer freshness, they can also be frozen for up to three months. Just make sure to let them thaw slightly before enjoying their chocolatey goodness!
Kitchen Wisdom & Success Tips
- Mixing: Ensure your peanut butter is at room temperature to create a smooth blend with the powdered sugar.
- Chilling: If the mixture feels too soft and difficult to roll, pop it in the fridge for a few minutes to firm up.
- Chocolate Melting: Microwave in 30-second intervals to avoid burning the chocolate.
Flavor Variations & Adaptations
Feel free to get creative! You can add some sea salt to the chocolate for a salted caramel twist, or replace Butterfinger with crushed Oreos or other chocolate bars. The possibilities are endless!
Reader Questions & Solutions
-
Can I use natural peanut butter?
Yes! Just ensure it’s well mixed and use less powdered sugar since natural peanut butter can be a bit runnier. -
What if the chocolate hardens too quickly?
Microwave it for a few seconds to soften it again. -
How can I make these nut-free?
You can substitute peanut butter with sunflower seed butter or another nut-free alternative. -
Are these gluten-free?
Yes, as long as the chocolate and Butterfinger you use are gluten-free. -
How can I adjust the sweetness?
You can reduce the powdered sugar slightly to balance the sweetness but be mindful that it may change the consistency.
Wrapping Up
Making these Homemade Butterfinger Balls reconnects us to sweet memories while creating new ones. They are perfect for gatherings, gifts, or simply indulging in a sweet treat after a long day. So, roll up your sleeves and dive into this fun cooking adventure. I promise you won’t regret it—every bite is a moment of sheer joy! Enjoy your baking, and remember, life is what you sweeten it!
PrintHomemade Butterfinger Balls

Delightful homemade Butterfinger Balls made with creamy peanut butter, crushed Butterfinger bars, and a smooth chocolate coating.
- Prep Time: 15 minutes
- Cook Time: 10 minutes
- Total Time: 25 minutes
- Yield: 24 balls 1x
- Category: Dessert
- Method: No-Bake
- Cuisine: American
- Diet: Vegetarian
Ingredients
- 1 cup creamy peanut butter
- 1 cup powdered sugar
- 1 cup crushed Butterfinger candy bars
- 1 cup chocolate chips
- 1 tablespoon butter
Instructions
- Combine the creamy peanut butter and powdered sugar until smooth.
- Fold in the crushed Butterfinger pieces.
- Roll the mixture into small balls and place them on a baking sheet lined with parchment paper.
- Melt the chocolate chips and butter together, stirring until smooth.
- Dip each ball into the melted chocolate, ensuring it’s completely coated.
- Return the coated balls to the baking sheet and allow them to set until the chocolate hardens.
- Enjoy your homemade Butterfinger Balls!
Notes
Store leftover Butterfinger Balls in an airtight container in the refrigerator for up to a week. For longer freshness, they can be frozen for up to three months.
Nutrition
- Serving Size: 1 ball
- Calories: 160
- Sugar: 15g
- Sodium: 90mg
- Fat: 7g
- Saturated Fat: 2g
- Unsaturated Fat: 5g
- Trans Fat: 0g
- Carbohydrates: 22g
- Fiber: 1g
- Protein: 3g
- Cholesterol: 5mg