Summer always brings a wave of joy and a craving for fresh, vibrant flavors. As the days get longer and warmer, I can’t help but think of my childhood summers spent gathering ripe, juicy strawberries from local farms. Each berry held the promise of sweet adventures and the perfect ingredients for delightful desserts. One of my all-time favorites? A creamy, dreamy cheesecake that transports me right back to those carefree days. Let me introduce you to my Delightful Strawberry Crunch Cheesecake for Summer Fun – a dessert that not only satisfies your sweet tooth but also embodies the spirit of summer sunshine.
Recipe Timing
- Prep Duration: 20 minutes
- Active Cooking: 15 minutes
- Total Duration: 2 hours (includes chilling)
- Portion Size: Serves 8
- Complexity: Simple
Nutritional Recipe
- Calories per portion: Approximately 450
- Protein: 5 grams
- Carbs: 50 grams
- Fats: 26 grams
- Fiber: 1 gram
- Sugars: 32 grams
- Sodium: 200 mg
Why You’ll Love This Delightful Strawberry Crunch Cheesecake for Summer Fun
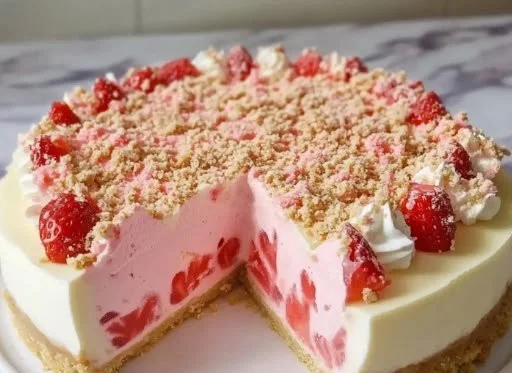
This cheesecake is more than just a dessert; it’s a celebration of flavors and textures. With a buttery vanilla cookie crust, a creamy strawberry filling, and a crunchy layer of strawberry wafer cookies, every bite is an experience. The bright color and fruity taste are sure to impress your guests at summer gatherings or family picnics. Plus, it’s a no-bake cheesecake, making it an easy and convenient treat to whip up on hot days when the last thing you want is to turn on the oven.
The Complete Cooking Journey
Gathering the ingredients is my favorite part! The smell of melted butter, the sound of whipped cream fluffing up, and the vibrant colors of strawberries – it feels like magic in the kitchen. Follow along as we create a delightful cheesecake that’s as pleasing to the eyes as it is to the palate.
Ingredients:
- 26 cookies Vanilla Cream Cookies (The perfect base for a sweet, buttery crust.)
- ½ cup Butter (Melted; can swap with coconut oil for dairy-free.)
- 1 pkg Strawberry Gelatin Powder (Gives a fruity flavor; can substitute with raspberry or mixed berry.)
- 8 ounces Cream Cheese (Ensure it’s softened for a smooth texture.)
- 1 cup Granulated Sugar (Balances flavors.)
- 1 cup Heavy Cream (Whipped to airy perfection; coconut cream for non-dairy.)
- ½ cup Powdered Sugar (Stabilizes and adds sweetness.)
- 1 cup Strawberry Wafer Cookies (Provide extra crunch and fruity flavor.)
Method:
Step 1: Create the Cookie Crust
In a food processor, pulse the Vanilla Cream Cookies into fine crumbs. Drizzle in the melted butter and pulse until well combined. Press the mixture into the bottom of a springform pan to form a firm crust. Set aside while you prepare the filling.
Step 2: Prepare the Creamy Filling
In a large mixing bowl, beat the softened cream cheese with granulated sugar until smooth. Gradually mix in the strawberry gelatin powder until fully incorporated, ensuring there are no lumps.
Step 3: Whip the Heavy Cream
In a separate bowl, whip the heavy cream until soft peaks form. Gently fold the whipped cream into the cream cheese mixture. This step is crucial for achieving that light, airy texture that makes cheesecakes so delightful.
Step 4: Assemble the Cheesecake
Pour the cream cheese mixture over the prepared cookie crust, smoothing it out with a spatula.
Step 5: Add the Crunchy Topping
Sprinkle the crushed Strawberry Wafer Cookies evenly over the top of the cheesecake, pressing them down slightly to adhere.
Step 6: Chill
Place the cheesecake in the refrigerator and chill for at least 2 hours, or until firm. This waiting is tough, but it’s worth it!
Step 7: Serve
Once set, release the cheesecake from the springform pan. Slice, serve, and watch as smiles blossom all around you.
Serving Suggestions & Pairings
This cheesecake is perfect on its own, but consider pairing it with a drizzle of chocolate sauce or a dollop of whipped cream for a touch of decadence. Fresh strawberries on the side can enhance its summer vibes. It’s an excellent dessert for BBQs, birthday parties, or simply a sunny afternoon at home.
Storage & Leftovers Guide
If you find yourself with leftovers (which I doubt!), the cheesecake can be stored in an airtight container in the refrigerator for up to 3 days. It’s best served fresh, but it still tastes delightful even after a day in the fridge.
Kitchen Wisdom & Success Tips
- Make sure your cream cheese is at room temperature to ensure a smooth filling.
- Whipping the cream separately is key to getting the right texture. Fold gently to keep it light.
- For a gluten-free version, opt for gluten-free cookies in the crust and topping.
Flavor Variations & Adaptations
- Fruity Twist: Swap the strawberry gelatin for raspberry or mixed berry for a delicious variation.
- Chocolate Delight: Add cocoa powder to the filling for a chocolate-strawberry cheesecake.
- Dairy-Free: Use coconut cream and dairy-free cookies to create a vegan-friendly version.
Reader Questions & Solutions
-
How do I prevent my cheesecake from cracking?
- Make sure not to overmix the cream cheese and don’t open the fridge during chilling.
-
Can I use fresh strawberries instead of gelatin?
- While fresh strawberries can be used, the gelatin helps set the cream and gives it a nice stability.
-
What can I do if my whipped cream isn’t thick enough?
- Ensure your bowl and beaters are cold, and whip until you see stiff peaks forming.
-
Can I freeze this cheesecake?
- Yes! You can freeze it for up to a month; just wrap it tightly in plastic wrap.
-
What if I don’t have a springform pan?
- You can use a regular pie dish; just be cautious when slicing.
Wrapping Up
This Delightful Strawberry Crunch Cheesecake brings the best flavors of summer to your table. Whether it’s a cheerful gathering or a small treat for yourself, making this cheesecake is a joyful experience. So, gather your ingredients, turn on some music, and immerse yourself in the bliss of baking. You’ve got this! Let’s make this summer unforgettable – one delicious slice at a time.
PrintDelightful Strawberry Crunch Cheesecake for Summer Fun

A creamy, no-bake cheesecake featuring a buttery cookie crust, a luscious strawberry filling, and a crunchy strawberry wafer topping, perfect for summer gatherings.
- Prep Time: 20 minutes
- Cook Time: 15 minutes
- Total Time: 120 minutes
- Yield: 8 servings 1x
- Category: Dessert
- Method: No-Bake
- Cuisine: American
- Diet: Vegetarian
Ingredients
- 26 Vanilla Cream Cookies
- ½ cup Butter, melted
- 1 package Strawberry Gelatin Powder
- 8 ounces Cream Cheese, softened
- 1 cup Granulated Sugar
- 1 cup Heavy Cream, whipped
- ½ cup Powdered Sugar
- 1 cup Strawberry Wafer Cookies, crushed
Instructions
- Create the Cookie Crust: In a food processor, pulse the Vanilla Cream Cookies into fine crumbs. Drizzle in the melted butter and pulse until well combined. Press the mixture into the bottom of a springform pan to form a firm crust. Set aside while you prepare the filling.
- Prepare the Creamy Filling: In a large mixing bowl, beat the softened cream cheese with granulated sugar until smooth. Gradually mix in the strawberry gelatin powder until fully incorporated, ensuring there are no lumps.
- Whip the Heavy Cream: In a separate bowl, whip the heavy cream until soft peaks form. Gently fold the whipped cream into the cream cheese mixture.
- Assemble the Cheesecake: Pour the cream cheese mixture over the prepared cookie crust, smoothing it out with a spatula.
- Add the Crunchy Topping: Sprinkle the crushed Strawberry Wafer Cookies evenly over the top of the cheesecake, pressing them down slightly to adhere.
- Chill: Place the cheesecake in the refrigerator and chill for at least 2 hours, or until firm.
- Serve: Once set, release the cheesecake from the springform pan. Slice, serve, and enjoy!
Notes
For a gluten-free version, use gluten-free cookies. If you have leftovers, store them in an airtight container in the fridge for up to 3 days.
Nutrition
- Serving Size: 1 slice
- Calories: 450
- Sugar: 32g
- Sodium: 200mg
- Fat: 26g
- Saturated Fat: 15g
- Unsaturated Fat: 8g
- Trans Fat: 0g
- Carbohydrates: 50g
- Fiber: 1g
- Protein: 5g
- Cholesterol: 60mg