Rice Pilaf has a magical way of transforming basic grains into something aromatic and comforting. I still remember the first time I encountered this dish at a vibrant little Mediterranean café. The moment I walked in, the warm, enticing aroma of sautéed onions and garlic wafted through the air, promising a meal that would hug my soul. It was served with a vibrant sprinkle of herbs and a side of fresh vegetables, creating a burst of color and flavor on my plate. From that day on, I knew I had to recreate it in my kitchen, and I’m thrilled to share with you my tried-and-true Rice Pilaf recipe that’s as simple as it is satisfying.
## Recipe Timing
- Prep Duration: 10 minutes
- Active Cooking: 25 minutes
- Total Duration: 35 minutes
- Portion Size: Serves 4
- Complexity: Simple
## Nutritional Recipe
- Calories per portion: Approximately 200
- Protein: 4 grams
- Carbs: 34 grams
- Fats: 6 grams
- Fiber: 1 gram
- Sugars: 1 gram
- Sodium: 250 mg
## Why You’ll Love This Rice Pilaf
This Rice Pilaf isn’t just another side dish—it’s a warm embrace on a busy weeknight, perfect for a comforting meal or a fantastic side for your grilled favorites. Each fluffy grain absorbs the savory flavors of the broth, while the sautéed onions and garlic elevate it from simple to spectacular. The best part? It’s incredibly versatile! You can toss in whatever herbs or veggies you have on hand to personalize it.
## The Complete Cooking Journey
Embarking on the journey of making this Rice Pilaf will feel like a culinary hug for your kitchen. The sizzle of onions and garlic, the dance of steam as the rice cooks, and the aroma that fills your home will make it clear: this dish is pure love. Whether you’re enjoying it as an everyday staple or dressing it up for a special occasion, it’s bound to become a favorite in your household.
## Ingredients:
- 1 cup rice
- 2 cups chicken or vegetable broth
- 1 onion, chopped
- 2 tablespoons olive oil
- Salt to taste
- Pepper to taste
- 1 teaspoon garlic, minced
- 1 bay leaf
- Optional: chopped herbs or vegetables
## Method:
### Step 1: Heat the Olive Oil
In a pot, heat 2 tablespoons of olive oil over medium heat. Let the oil warm until it shimmers, inviting you to create something delicious.
### Step 2: Sauté the Onion
Add the chopped onion and sauté until it becomes translucent. This step is crucial; the sweet, aromatic notes of the onions are the foundation of your pilaf.
### Step 3: Add the Garlic
Stir in the minced garlic and cook for another minute. As the garlic releases its wonderful fragrance, your kitchen will smell like a cozy restaurant.
### Step 4: Toast the Rice
Now it’s time to stir in the rice. Cook for 2-3 minutes, until the grains become lightly toasted. This toasting enhances the rice’s flavor and gives it a lovely nuttiness.
### Step 5: Add Broth and Seasoning
Pour in the broth, add the bay leaf, and season with salt and pepper to taste. The liquid will bubble and fizz—this is the sound of a delicious meal on the way!
### Step 6: Bring to a Boil
Bring the mixture to a rapid boil, then reduce the heat to low and cover the pot. Let it simmer peacefully while you soak in the tantalizing scents.
### Step 7: Simmer to Perfection
Simmer for about 18-20 minutes or until the rice is cooked and the liquid is absorbed. Resist the temptation to open the lid too soon; this step ensures fluffy, perfectly cooked rice.
### Step 8: Fluff and Finish
Remove the bay leaf and fluff the rice with a fork. This prevents the grains from clumping and allows them to breathe.
### Step 9: Add Finishing Touches
If you like, stir in some chopped herbs or extra vegetables before serving. This adds freshness and enhances the visual appeal of your dish.
## Serving Suggestions & Pairings
Serve your Rice Pilaf alongside grilled chicken, roasted vegetables, or a rich vegetable stew. It makes a fantastic base for a myriad of dishes or a delightful side at a dinner gathering. A sprinkle of fresh parsley or dill just before serving adds a pop of color and freshness.
## Storage & Leftovers Guide
Store any leftovers in an airtight container in the refrigerator for up to 4 days. If you want to keep it longer, consider freezing the pilaf. Just place it in a freezer-safe container, and it should last for about 2 months. To reheat, simply thaw overnight in the fridge and warm it on the stovetop or microwave, adding a splash of broth if needed to revive its lovely texture.
## Kitchen Wisdom & Success Tips
- Use quality broth: The flavor of your broth will significantly impact the taste of your pilaf, so choose a quality chicken or vegetable broth.
- Don’t skip the toasting step: Toasting the rice enhances its flavor and prevents it from becoming gummy.
- Let it rest: Allow the pilaf to sit for a few minutes after cooking before fluffing it up. It coats the grains in flavor and improves the texture.
## Flavor Variations & Adaptations
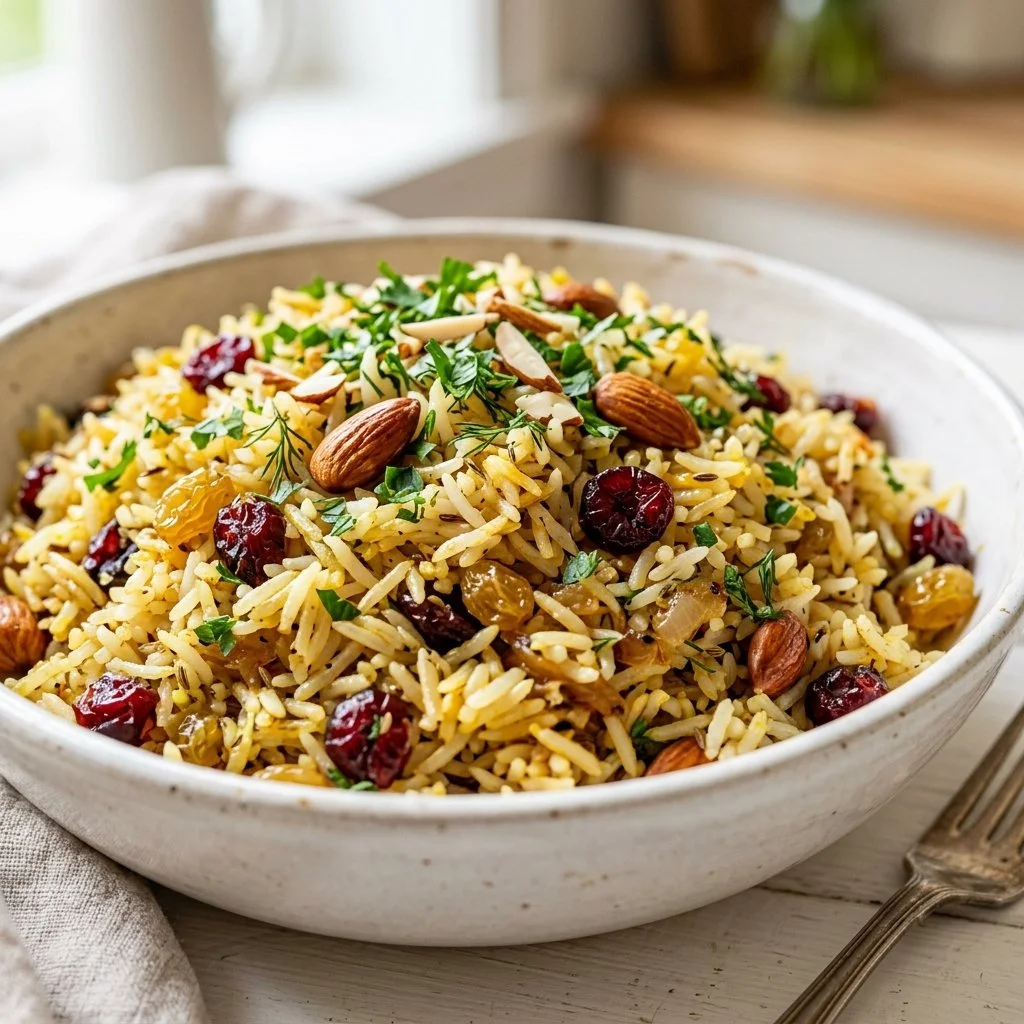
Feel free to play with flavors! Add spices like cumin or turmeric for an earthy note, or throw in some dried fruits like raisins or apricots for a touch of sweetness. You can also customize with seasonal vegetables, lean proteins, or nuts for added texture.
## Reader Questions & Solutions
- Can I use brown rice instead? Yes, but brown rice will require a longer cooking time (about 40-45 minutes) and more liquid.
- What if I don’t have bay leaves? You can skip them or substitute with a pinch of thyme or oregano.
- Can I make it vegan? Absolutely! Use vegetable broth and omit any meat.
- How can I make it more filling? Toss in cooked beans or chickpeas for added protein and texture.
- Why isn’t my rice fluffy? Avoid lifting the lid while it cooks; steam is essential for fluffy rice. Also, ensure the rice is rinsed to remove excess starch.
## Wrapping Up
Cooking Rice Pilaf is not just about following a recipe—it’s about creating a comforting dish that brings joy to your table. With each fluffy bite, you’ll be reminded of the warmth of home and the simple pleasures that food can bring. I hope you give this recipe a try and let it become a cherished part of your culinary repertoire. Happy cooking!