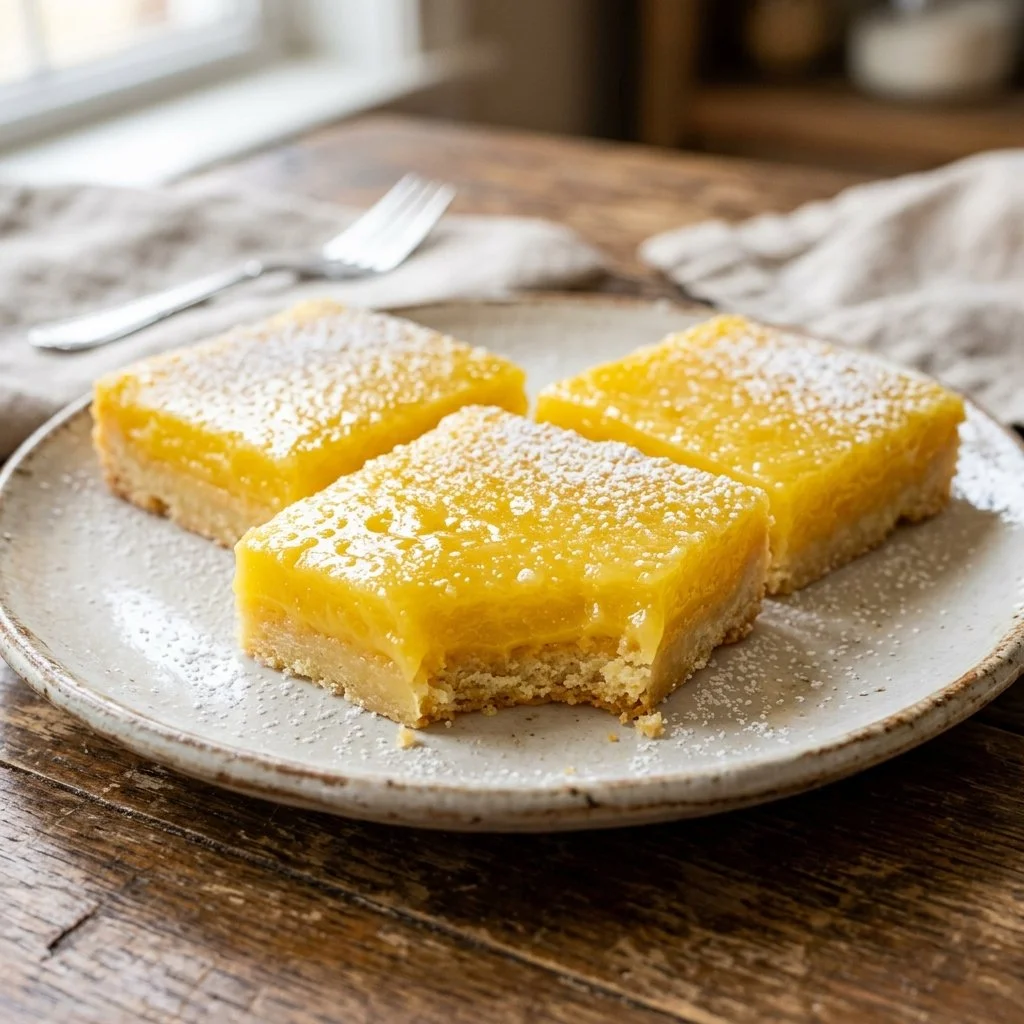
There’s something undeniably enchanting about the zesty, fresh flavor of lemon bars, isn’t there? Every time I prepare these delightful treats, I am whisked back to sun-drenched picnics during warm summer months where laughter danced with the breeze. I remember my grandmother, apron-clad and bustling about the kitchen, her laughter echoing as the sunlight filtered through the window. She would whip up a batch of lemon bars that seemed to capture sunshine in a dish. The tartness of the lemons paired with a buttery, crumbly crust created a heavenly balance that felt like a little bite of happiness.
Today, I’m excited to share with you my take on these classic Lemon Bars – a recipe that’s as simple as it is delicious. Let’s bring that sunshine into your kitchen!
Recipe Timing
- Prep Duration: 15 minutes
- Active Cooking: 35-40 minutes
- Total Duration: 1 hour
- Portion Size: 16 squares
- Complexity: Simple
Nutritional Recipe
- Calories per portion: Approximately 150
- Protein: 2g
- Carbs: 20g
- Fats: 7g
- Fiber: 0g
- Sugars: 11g
- Sodium: 30mg
Why You’ll Love This Lemon Bars
These lemon bars are not only super easy to make but they also embody a perfect harmony of sweet and tart flavors, with a melt-in-your-mouth texture that keeps you coming back for more. Each square is a sunny bite that brightens your day, whether served at a party or as a midday pick-me-up. You can enjoy them warm from the oven or chilled in the fridge – they are versatile enough for any occasion. And let’s not forget that dusting of powdered sugar on top, which adds a beautiful finishing touch and a hint of sweetness to counterbalance the zesty lemon filling.
The Complete Cooking Journey
Now, let’s embark on this culinary adventure! We’ll start by preparing the crust, followed by mixing the vibrant lemon filling, and finally, baking these little squares of sunshine to perfection. Gather your ingredients, roll up your sleeves, and let’s get started!
Ingredients:
- 1 cup all-purpose flour
- 1/2 cup powdered sugar
- 1/2 cup butter, softened
- 2 large eggs
- 1 cup granulated sugar
- 2 tablespoons lemon juice
- 1 tablespoon lemon zest
- 1/2 teaspoon baking powder
- Powdered sugar for dusting
Method:
Step 1: Preheat and Prep Your Baking Dish
Preheat the oven to 350°F (175°C) and grease a 9×9 inch baking dish. This step ensures a non-stick surface for your delicious lemon bars, making them easy to slice and serve later.
Step 2: Create the Crust
In a mixing bowl, combine the all-purpose flour and powdered sugar. Cut in the softened butter using a pastry cutter or your fingers until the mixture resembles coarse crumbs. This will be the base of our lemon bars, adding a delightful buttery crunch.
Step 3: Bake the Crust
Press the crumbly mixture evenly into the bottom of the prepared dish. Bake for 15 minutes, allowing the crust to develop a delicate golden color and a sturdy base for our tangy lemon filling.
Step 4: Mix the Lemon Filling
In another bowl, whisk together the large eggs, granulated sugar, lemon juice, lemon zest, and baking powder until smooth. This vibrant mixture is where the magic happens, transforming simple ingredients into something tastefully extraordinary, bursting with citrusy flavor.
Step 5: Pour and Bake Again
Once your crust is ready and slightly cooled, pour the lemon mixture over the baked crust, spreading it out evenly. Bake for an additional 20-25 minutes, or until the filling is set and slightly golden. Your kitchen will start to smell heavenly right about now!
Step 6: Cool Down
Allow the lemon bars to cool completely in the baking dish. Once cooled, dust them generously with powdered sugar and cut into squares. This sweet blanket transforms the bars into a lovely treat.
Step 7: Serve and Enjoy!
Serve these delectable bars at room temperature or chilled. Trust me, the refreshing taste will bring a smile to every face.
Serving Suggestions & Pairings
Pair your lemon bars with a dollop of whipped cream or a scoop of vanilla ice cream for an indulgent treat. They also blend beautifully with a cup of freshly brewed iced tea or lemonade for a perfect afternoon snack. Thinking of a picnic? These lemon bars will be the star of your outdoor spread, delighting both kids and adults alike!
Storage & Leftovers Guide
Store your lemon bars in an airtight container in the refrigerator where they will keep fresh for up to a week. If you’re feeling adventurous, freeze them for up to three months. Just make sure to separate layers with parchment paper to prevent them from sticking together.
Kitchen Wisdom & Success Tips
- Make sure to let the lemon bars cool completely before slicing – this helps achieve clean cuts and distinct squares.
- Use fresh lemons rather than bottled lemon juice – the flavor is worth the extra effort!
- Don’t skip the dusting of powdered sugar; it adds a beautiful contrast to the bright yellow filling.
Flavor Variations & Adaptations
Feel free to explore! You can add a hint of lavender or rosemary for an herbaceous twist, or mix in some berries for a fruity variation. For a gluten-free experience, simply substitute the all-purpose flour with a gluten-free blend.
Reader Questions & Solutions
- Can I use bottled lemon juice? Yes, but fresh lemon juice and zest will give you the best flavor!
- How can I ensure my bars don’t crack? Avoid overbaking; keep an eye on the bars as they finish and remove them as soon as the filling is set.
- Can I use margarine instead of butter? Margarin can work in a pinch, but the results may not be as rich and buttery.
- What should I do if my filling is too runny? It may need more baking time. Let it bake until it is set and slightly golden on top.
- How can I elevate the flavor further? Consider adding a little bit of coconut extract or a drizzle of chocolate on top for a fun twist!
Wrapping Up
I hope you feel inspired to try making these fabulous lemon bars at home! They’re not just a dessert; they’re a sweet memory waiting to happen, bringing a slice of sunshine wherever they go. So grab those fresh lemons, and let’s bake up some happiness together! Happy baking!
PrintClassic Lemon Bars

Delightful lemon bars with a perfect balance of sweet and tart flavors, featuring a buttery, crumbly crust.
- Prep Time: 15 minutes
- Cook Time: 35 minutes
- Total Time: 50 minutes
- Yield: 16 squares 1x
- Category: Dessert
- Method: Baking
- Cuisine: American
- Diet: Vegetarian
Ingredients
- 1 cup all-purpose flour
- 1/2 cup powdered sugar
- 1/2 cup butter, softened
- 2 large eggs
- 1 cup granulated sugar
- 2 tablespoons lemon juice
- 1 tablespoon lemon zest
- 1/2 teaspoon baking powder
- Powdered sugar for dusting
Instructions
- Preheat the oven to 350°F (175°C) and grease a 9×9 inch baking dish.
- Combine the all-purpose flour and powdered sugar in a mixing bowl, then cut in the softened butter until the mixture resembles coarse crumbs.
- Press the mixture evenly into the bottom of the prepared dish and bake for 15 minutes.
- Whisk together the eggs, granulated sugar, lemon juice, lemon zest, and baking powder until smooth.
- Pour the lemon mixture over the baked crust and bake for an additional 20-25 minutes, or until set and slightly golden.
- Allow the bars to cool completely in the baking dish. Dust with powdered sugar and cut into squares.
- Serve at room temperature or chilled.
Notes
For best results, use fresh lemon juice and zest. Let the bars cool completely before slicing for clean cuts.
Nutrition
- Serving Size: 1 square
- Calories: 150
- Sugar: 11g
- Sodium: 30mg
- Fat: 7g
- Saturated Fat: 4g
- Unsaturated Fat: 3g
- Trans Fat: 0g
- Carbohydrates: 20g
- Fiber: 0g
- Protein: 2g
- Cholesterol: 60mg