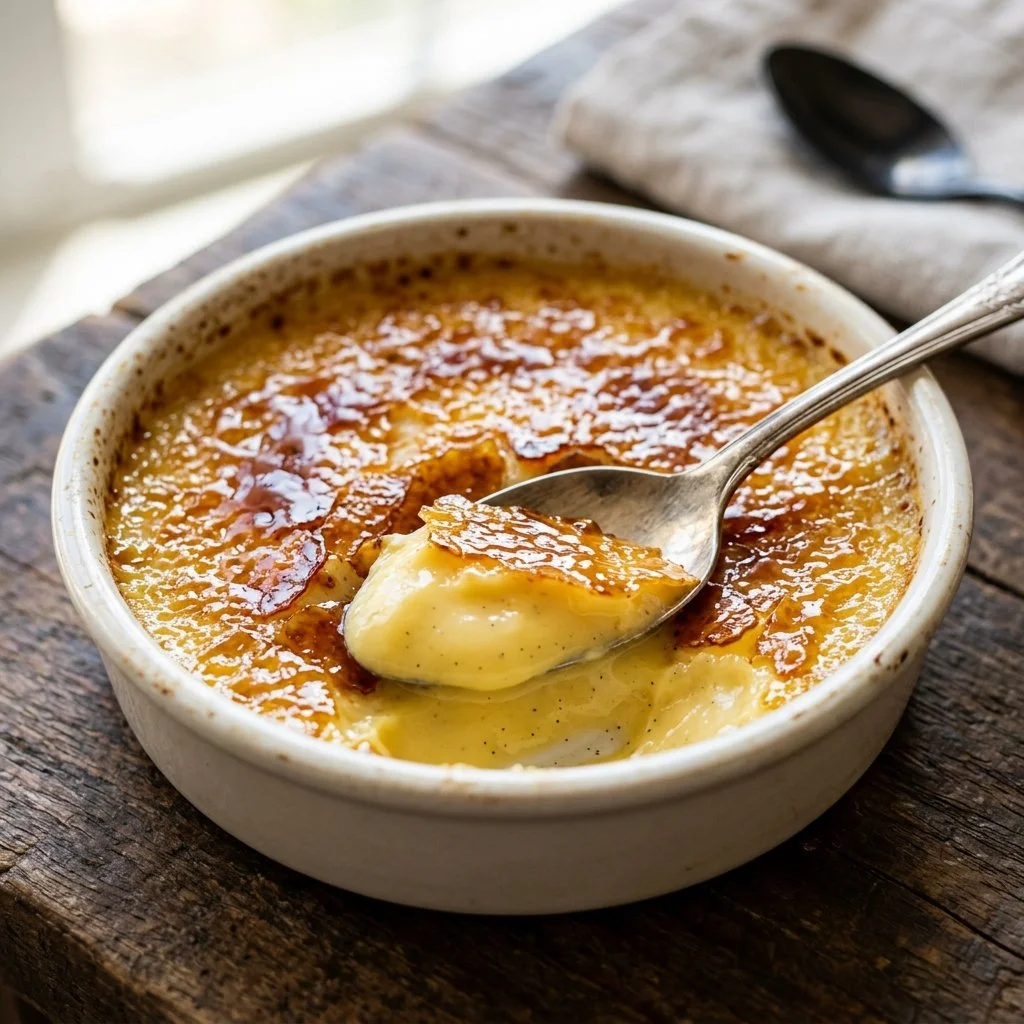
There’s something utterly enchanting about the first crack of a caramelized sugar crust on top of a perfectly made crème brûlée. It feels like a little culinary magic. Life gets hectic, and every now and then, we need to indulge in the luxurious simplicity of this classic dessert. I remember the first time I tried making it at home—terrified but excited, the kitchen filled with warm vanilla and creamy scents. With each step, I felt like a pastry chef in a quaint French bistro. When I finally lifted the spoon, piercing that golden crust to reveal the creamy custard underneath, I knew I had created something special.
This delicious treat is perfect for impressing guests or simply treating yourself after a long week. And the best part? It’s simpler than it may seem. Let’s dive in!
Recipe Timing
- Prep Duration: 15 minutes
- Active Cooking: 40 minutes
- Total Duration: 1 hour, 30 minutes (includes chilling time)
- Portion Size: 4 servings
- Complexity: Moderate
Nutritional Recipe
- Calories per portion: 390 calories
- Protein: 6 grams
- Carbs: 32 grams
- Fats: 29 grams
- Fiber: 0 grams
- Sugars: 26 grams
- Sodium: 40 mg
Why You’ll Love This Crème Brûlée
Crème brûlée is a celebration of contrasts—the smooth, rich custard meets the crackly caramelized sugar topping that brings a delightful surprise with each bite. You can personalize it by introducing flavors like chocolate, coffee, or citrus zest. It’s an indulgent dessert that invites you to slow down, enjoy the moment, and savor the experience. Once you’ve made this French classic at home, you’ll want to showcase it at every gathering.
The Complete Cooking Journey
As you set out to create this buttery dessert, you’ll embark on a delightful journey through the realms of custard creation and caramel artistry. From heating the cream to the rhythmic whisking of egg yolks, every step builds toward the glorious final product. Its simplicity is its charm, yet the satisfaction it brings is anything but simple.
Ingredients:
- 2 cups heavy cream
- 1 teaspoon vanilla extract
- 5 large egg yolks
- 1/2 cup granulated sugar
- 2 tablespoons brown sugar
Method:
Step 1: Preheat the Oven
Start by preheating your oven to 325°F (160°C). This ensures that when you’re ready to bake, your custards will set perfectly.
Step 2: Heat the Cream
In a saucepan, gently heat the heavy cream and vanilla extract over medium heat until it’s hot, but don’t let it boil. We want that creamy goodness to be perfectly warm and infused with vanilla.
Step 3: Whisk Yolk and Sugar
In a separate bowl, whisk together the egg yolks and granulated sugar until the mixture becomes pale and smooth. This step is all about getting air into the yolks to create a light, airy texture.
Step 4: Combine Cream and Egg Mixture
Gradually add the hot cream to the egg mixture, whisking constantly to prevent the eggs from scrambling. This careful melding will result in a lovely creamy custard.
Step 5: Strain the Custard
Strain the mixture through a fine sieve into a large measuring cup. This step is key to ensuring a velvety smooth custard—no lumps allowed!
Step 6: Distribute into Ramekins
Divide the custard mixture among your ramekins. The individual servings add that personal touch to your dessert.
Step 7: Prepare for Water Bath
Place the ramekins in a baking dish and fill the dish with hot water until it reaches halfway up the sides of the ramekins. This water bath will provide gentle heat for even baking.
Step 8: Bake to Perfection
Bake for about 30-35 minutes or until the custards are set but still slightly jiggly in the center. Remember, they’ll continue to set as they cool.
Step 9: Cool and Chill
Remove the ramekins from the water and let them cool at room temperature. Once cool, refrigerate them until chilled—at least 2 hours, so those flavors meld beautifully.
Step 10: Caramelize the Sugar
Before serving, sprinkle a thin layer of brown sugar on top of each custard. Using a kitchen torch, caramelize the sugar until it bubbles and turns a beautiful golden color. This is the best part—watching the transformation!
Step 11: Serve and Enjoy!
Let the custards cool slightly before serving. Now, you’re ready to dig in!
Serving Suggestions & Pairings
Crème brûlée is divine on its own, but you can elevate the experience by pairing it with fresh berries for a burst of flavor, or a dollop of whipped cream for added richness. A sprinkle of sea salt can also enhance the sweet notes of the burnt sugar.
Storage & Leftovers Guide
Keep any leftover crème brûlée in the refrigerator covered with plastic wrap for up to 3 days. It’s best to caramelize the sugar just before serving for that delightful crack!
Kitchen Wisdom & Success Tips
- Ensure your egg yolks are at room temperature for better emulsification.
- Don’t rush the heating of the cream—this step is crucial for flavor.
- If you don’t have a kitchen torch, broil the sugar under a broiler for a minute or two, keeping a close watch to avoid burning.
Flavor Variations & Adaptations
Excited to experiment? Try adding a teaspoon of espresso powder for mocha crème brûlée, or infusing the cream with herbal notes like lavender or mint for an aromatic twist. The possibilities are endless!
Reader Questions & Solutions
- What if my custards don’t set? Ensure your oven temperature is accurate and consider increasing baking time slightly.
- Can I use something other than heavy cream? Half-and-half can be a lighter option, but the texture will be less rich.
- How do I make it ahead of time? Make and chill the custards up to 2 days in advance, caramelizing the sugar right before serving.
- What if I don’t have ramekins? Any oven-safe dish can be used, just adjust the baking time according to the size.
- Why is my sugar not caramelizing? Make sure you’re using granulated or brown sugar, as powdered sugar won’t work for this.
Wrapping Up
Crème brûlée is not just a dessert; it’s a celebration of life’s little pleasures. With its creamy base and crispy caramel topping, it invites you to slow down, take a moment, and relish something truly special. So gather your ingredients and your loved ones, and let the magic happen in your kitchen. Happy cooking, and enjoy every delicious bite!
PrintCrème Brûlée

An enchanting classic French dessert with a creamy custard base and a crackly caramelized sugar topping.
- Prep Time: 15 minutes
- Cook Time: 40 minutes
- Total Time: 90 minutes
- Yield: 4 servings 1x
- Category: Dessert
- Method: Baking
- Cuisine: French
- Diet: Vegetarian
Ingredients
- 2 cups heavy cream
- 1 teaspoon vanilla extract
- 5 large egg yolks
- 1/2 cup granulated sugar
- 2 tablespoons brown sugar
Instructions
- Preheat the oven to 325°F (160°C).
- Heat the heavy cream and vanilla extract in a saucepan over medium heat until hot, but do not boil.
- Whisk together the egg yolks and granulated sugar in a separate bowl until pale and smooth.
- Combine the hot cream with the egg mixture, whisking constantly to prevent scrambling.
- Strain the mixture through a fine sieve into a large measuring cup.
- Distribute the custard into ramekins.
- Prepare a water bath by placing the ramekins in a baking dish and filling it with hot water until halfway up the sides of the ramekins.
- Bake for 30-35 minutes until set but still slightly jiggly in the center.
- Cool the ramekins at room temperature and then refrigerate for at least 2 hours.
- Caramelize a thin layer of brown sugar on top of each custard using a kitchen torch.
- Serve and enjoy!
Notes
For best results, caramelize the sugar just before serving. Store leftovers covered in the refrigerator for up to 3 days.
Nutrition
- Serving Size: 1 serving
- Calories: 390
- Sugar: 26g
- Sodium: 40mg
- Fat: 29g
- Saturated Fat: 17g
- Unsaturated Fat: 12g
- Trans Fat: 0g
- Carbohydrates: 32g
- Fiber: 0g
- Protein: 6g
- Cholesterol: 120mg