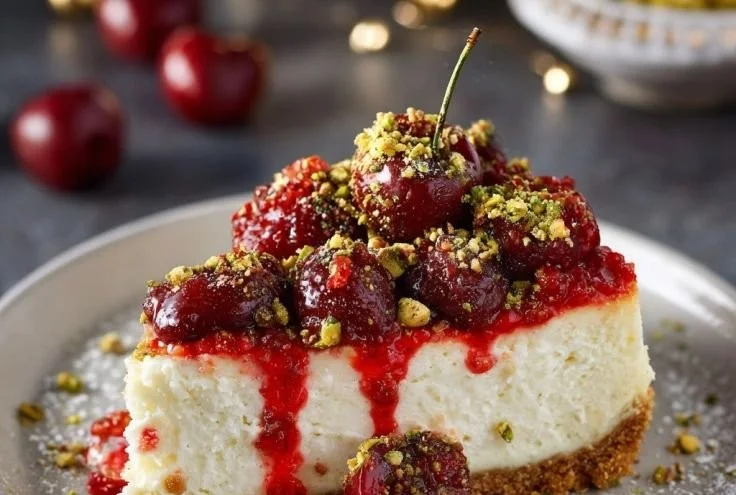
There are few desserts that evoke the joy of summer more than a slice of creamy cheesecake adorned with fresh cherries. Last summer, during a family gathering, I decided to bring my Cherry Pistachio Cheesecake. The vibrant colors of the tart cherries and the crunch of the pistachios instantly drew everyone in. As our plates filled, laughter filled the room, and the sweet, rich aroma of cheesecake wafted through the air. Each bite was a perfect balance of creamy, sweet, and slightly tangy, with a delightful crunch from the pistachios. It was a moment of happiness shared over dessert, reminding me how food connects us all.
Recipe Timing
- Prep Duration: 20 minutes
- Active Cooking: 1 hour 15 minutes
- Total Duration: 4 hours 35 minutes (including cooling and chilling)
- Portion Size: Serves 10-12
- Complexity: Moderate
Nutritional Recipe
- Calories per portion: Approximately 420 kcal
- Protein: 7 g per serving
- Carbs: 42 g per serving
- Fats: 26 g per serving
- Fiber: 1 g per serving
- Sugars: 23 g per serving
- Sodium: 360 mg per serving
Why You’ll Love This Cherry Pistachio Cheesecake
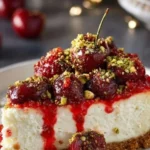
This Cherry Pistachio Cheesecake is not just a dessert; it’s an experience. It boasts a crumbly, buttery graham cracker crust layered with a luxuriously creamy filling made from rich cream cheese and tangy sour cream. The cherry topping bursts with flavor and perfectly complements the creamy cheesecake, creating a mouthwatering contrast. The added crunch from the pistachios takes this cheesecake to the next level, providing texture and a slightly nutty flavor that balances the sweetness beautifully. Whether it’s a holiday gathering or a simple family dinner, this cheesecake is sure to impress and delight.
The Complete Cooking Journey
Step 1: Preheat Your Oven
Preheat your oven to 350°F (175°C). A hot oven is essential for establishing the perfect texture in your cheesecake.
Step 2: Create the Crust
Mix crushed graham crackers or digestive biscuits with 3-4 tablespoons of sugar and the melted butter until the mixture is moist. This step sets the foundation for your cheesecake.
Step 3: Form the Crust in the Pan
Press the mixture firmly into the bottom and slightly up the sides of a 9-10 inch springform pan. Ensuring it’s compact will help it hold together once baked.
Step 4: Bake the Crust
Bake your crust for 8-10 minutes, then set it aside to cool. This quick bake solidifies the butter and gives the crust a lovely toasted flavor.
Step 5: Beat the Cream Cheese
In a large bowl, beat the softened cream cheese with the remaining 1½ cups of sugar until it’s smooth and creamy. This is where you start to create the luscious texture of your cheesecake.
Step 6: Add in the Eggs
Add the eggs one at a time, mixing gently after each addition. This incorporation method ensures a light and airy filling.
Step 7: Blend in the Dairy and Flavorings
Blend in the sour cream or Greek yogurt, vanilla extract, and optional lemon zest until fully combined. The sour cream adds tang, while the lemon zest brightens the flavor profile.
Step 8: Pour Filling Over Crust
Pour the cheesecake filling over the cooled crust and smooth the top. A nice even top will make for beautiful slices later on.
Step 9: Bake the Cheesecake
Bake the cheesecake for 45-55 minutes, until the edges are set and the center slightly jiggles. It’s important not to overbake, as the cheesecake continues to firm up while cooling.
Step 10: Cool the Cheesecake in the Oven
Turn off the oven and leave the cheesecake inside with the door slightly open for 1 hour. This gradual cooling method helps prevent cracks on the surface.
Step 11: Chill the Cheesecake
Cool the cheesecake completely at room temperature, then refrigerate for at least 4 hours or overnight. Patience is key here, as the chilling time allows flavors to meld beautifully.
Step 12: Cook the Cherry Topping
In a saucepan, cook the cherries with ½ cup of sugar and 1 tablespoon of lemon juice over medium heat until softened, about 5-7 minutes. This step brings out the natural sweetness of the cherries.
Step 13: Thicken the Cherry Sauce
Stir in the cornstarch slurry and cook until the topping thickens, then cool. This will create a luscious layer to crown your cheesecake.
Step 14: Assemble the Cheesecake
Spread the cherry topping over the chilled cheesecake and sprinkle the roughly chopped pistachios on top. This final touch not only adds flavor but also a beautiful visual.
Step 15: Slice and Serve
Slice and serve with extra cherries or whipped cream if desired. Enjoy the balance of creamy cheesecake with a cherry burst in every bite!
Serving Suggestions & Pairings
This Cherry Pistachio Cheesecake pairs wonderfully with a dollop of whipped cream or a scoop of vanilla ice cream. For a refreshing addition, serve alongside fresh mint leaves or a sprinkling of extra pistachios. It also goes beautifully with a cup of strong coffee or a refreshing iced tea.
Storage & Leftovers Guide
Store any leftover cheesecake in an airtight container in the refrigerator for up to 5 days. To freeze, wrap individual slices in plastic wrap and foil; they’ll keep well for up to 2 months. Simply thaw in the refrigerator before enjoying again!
Kitchen Wisdom & Success Tips
- Make sure to let your cream cheese soften for a few hours at room temperature or even slightly microwave it in short bursts; this helps achieve a smooth batter.
- Use a water bath while baking the cheesecake to prevent cracking, if desired.
- For a deeper flavor, let the cheesecake sit overnight in the refrigerator before serving; this allows the flavors to deepen and marry beautifully.
Flavor Variations & Adaptations
Feel free to switch up the fruit topping according to season! Raspberries, blueberries, or even a mixed berry topping can provide a delightful twist. If you’re looking for a chocolate twist, consider a chocolate ganache layer under the cherry topping!
Reader Questions & Solutions
-
Q: My cheesecake cracks while baking, what did I do wrong?
A: Cracking can happen if the cheesecake is baked too long or if it cools too quickly. Try baking at a lower temperature or using a water bath for more even cooking. -
Q: Can I use low-fat cream cheese?
A: Yes, but the texture and richness may vary. Incorporate a higher fat content dairy as a counterbalance, such as sour cream. -
Q: How do I prevent a soggy crust?
A: Make sure to bake the crust until golden, and let it cool completely before adding the filling. Additionally, avoid adding too much liquid to the filling. -
Q: Can I use frozen cherries for the topping?
A: Absolutely! Just be mindful of the additional moisture. Thaw and drain them before cooking down with sugar. -
Q: What if my cheesecake isn’t firm enough after chilling?
A: Ensure you bake it until the edges are set, and consider chilling it for longer. If all else fails, a quick freeze can help firm it up!
Wrapping Up
There you have it! This Cherry Pistachio Cheesecake is not just a treat; it’s a celebration of flavors and textures that spark joy and sweet moments in the kitchen. It’s a reminder that cooking is about sharing love, creating memories, and savoring each moment—one slice at a time. So grab those ingredients, embark on this baking adventure, and watch as your friends and family light up with delight! Happy baking!
PrintCherry Pistachio Cheesecake
A creamy cheesecake topped with fresh cherries and crunchy pistachios, perfect for summer gatherings.
- Prep Time: 20 minutes
- Cook Time: 75 minutes
- Total Time: 275 minutes
- Yield: 10-12 servings 1x
- Category: Dessert
- Method: Baking
- Cuisine: American
- Diet: Vegetarian
Ingredients
- 2 cups crushed graham crackers
- 4 tablespoons sugar
- 1/2 cup melted butter
- 3 (8 oz) packages cream cheese, softened
- 1 1/2 cups sugar
- 3 large eggs
- 1 cup sour cream or Greek yogurt
- 1 teaspoon vanilla extract
- Zest of 1 lemon (optional)
- 2 cups fresh cherries, pitted and halved
- 1/2 cup sugar (for topping)
- 1 tablespoon lemon juice
- 2 tablespoons cornstarch mixed with 2 tablespoons water (slurry)
- 1/2 cup roughly chopped pistachios for garnish
Instructions
- Preheat your oven to 350°F (175°C).
- Mix crushed graham crackers with 4 tablespoons of sugar and melted butter until moist.
- Press the mixture into the bottom and sides of a 9-10 inch springform pan.
- Bake the crust for 8-10 minutes, then cool.
- Beat the softened cream cheese with 1 1/2 cups of sugar until smooth.
- Add the eggs one at a time, mixing gently.
- Blend in sour cream, vanilla extract, and optional lemon zest.
- Pour the cheesecake filling over the cooled crust and smooth the top.
- Bake the cheesecake for 45-55 minutes until edges are set.
- Turn off the oven, leave cheesecake inside with the door slightly open for 1 hour.
- Cool at room temperature, then refrigerate for at least 4 hours or overnight.
- Cook cherries with 1/2 cup sugar and lemon juice over medium heat for 5-7 minutes.
- Stir in cornstarch slurry and cook until thickened, then cool.
- Spread the cherry topping over the chilled cheesecake and sprinkle with pistachios.
- Slice and serve with extra cherries or whipped cream if desired.
Notes
Store leftovers in an airtight container in the refrigerator for up to 5 days. To freeze, wrap individual slices in plastic wrap and foil for up to 2 months.
Nutrition
- Serving Size: 1 slice
- Calories: 420
- Sugar: 23g
- Sodium: 360mg
- Fat: 26g
- Saturated Fat: 14g
- Unsaturated Fat: 8g
- Trans Fat: 0g
- Carbohydrates: 42g
- Fiber: 1g
- Protein: 7g
- Cholesterol: 60mg