There’s something undeniably nostalgic about the delicate crunch of a homemade cannoli shell. The first time I made these delectable treats, I was swept away by the memory of a charming little Italian bakery down the street from my childhood home. The air was always fragrant with sugar and vanilla, and the glass case was filled with pastries that seemed to whisper tales of old-world love and craftsmanship. When I took my first bite of cannoli—light, crispy shell cradling hidden treasures of sweet, creamy filling—I was hooked. Now, I invite you to join me in crafting your own homemade cannoli shells, bringing a slice of that sweet nostalgia into your kitchen and, perhaps, your heart.
## Recipe Timing
- Prep Duration: 30 minutes (plus resting time)
- Active Cooking: 20 minutes
- Total Duration: 1 hour
- Portion Size: Makes about 10-12 shells
- Complexity: Simple
## Nutritional Recipe
- Calories per portion: Approximately 90
- Protein: 2g per serving
- Carbs: 10g per serving
- Fats: 4g per serving
- Fiber: 0g per serving
- Sugars: 1g per serving
- Sodium: 30mg per serving
## Why You’ll Love This Homemade Cannoli Shells
Making cannoli shells from scratch is not only rewarding but truly simple! The crispiness of your freshly fried shells is unmatched; you can control the ingredients and create a treat that suits your taste buds perfectly. Imagine biting into a crunchy shell that crackles and gives way to sweet ricotta filling, with hints of citrus zest and chocolate—pure ecstasy! Plus, the satisfaction of sharing these with family and friends can melt anyone’s heart. Trust me, the joy of seeing loved ones delight in your homemade creations is worth every bit of effort.
## The Complete Cooking Journey
Making homemade cannoli shells doesn’t have to be daunting. With a few simple steps, you’ll embrace the art of pastry making. Ready to dive in? Get your apron on, and let’s roll up our sleeves!
## Ingredients:
- 1 cup all-purpose flour
- 2 tablespoons granulated sugar
- 1/2 teaspoon ground cinnamon
- 1/4 teaspoon salt
- 1 tablespoon unsalted butter, softened
- 1 egg
- 1 tablespoon white wine or Marsala
- Oil for frying
## Method:
-
Step 1: Combine Dry Ingredients
In a bowl, mix together the flour, sugar, ground cinnamon, and salt. This blend is the foundation of your cannoli’s delicate texture and flavor.
-
Step 2: Form the Dough
Add softened butter, egg, and white wine to the dry mixture. Knead the mixture until it forms a smooth and pliable dough. This is where the magic begins!
-
Step 3: Rest the Dough
Wrap the dough tightly in plastic and let it rest for at least 30 minutes. This resting period allows the gluten to relax, making it easier to roll out later.
-
Step 4: Roll Out the Dough
Flour your work surface lightly and roll out the rested dough until it’s thin—about 1/8 inch thick. This is key to achieving that perfect crispiness.
-
Step 5: Cut Circles
Using a round cutter, cut the rolled dough into circles. Aim for about 3-4 inches in diameter for each shell to ensure a nice size for filling.
-
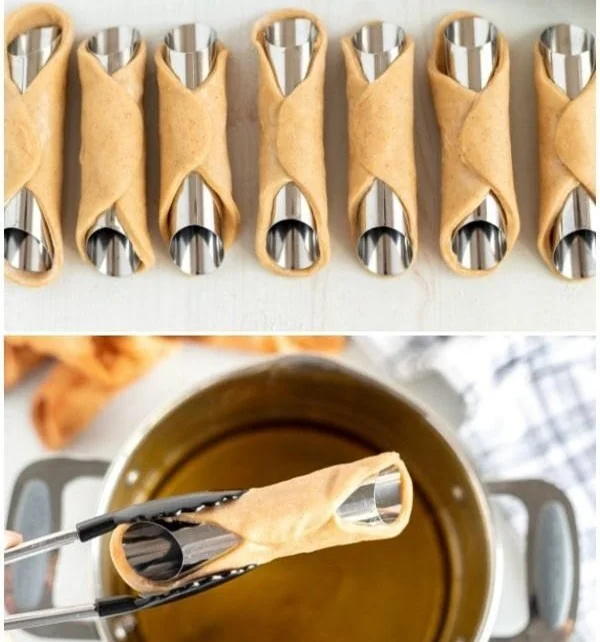
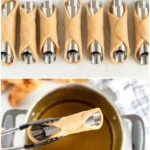
Step 6: Shape the Shells
Gently wrap each circle around a cannoli tube, sealing the edges with a bit of water or egg wash. This wrapping technique is what gives the cannoli its signature shape.
-
Step 7: Fry to Perfection
In a deep pan, heat oil to 350°F (175°C). Fry the shaped shells in batches until they’re golden brown, about 2-3 minutes on each side. Keep a close eye on them; they fry quickly!
-
Step 8: Drain and Cool
Once golden, carefully remove the shells and drain them on paper towels. Allow them to cool completely before filling with your favorite cannoli cream.
## Serving Suggestions & Pairings
These crispy cannoli shells shine when paired with a classic sweet ricotta filling. Consider adding mini chocolate chips or candied orange peels for extra flair. They make a lovely dessert at any gathering, and serve beautifully alongside espresso or cappuccino for a delightful after-dinner treat.
## Storage & Leftovers Guide
The cannoli shells can be stored in an airtight container at room temperature for up to 3 days. However, I recommend filling them just before serving to keep that crunch intact. Leftover filling can last in the fridge for up to a week—just be sure to store it in a covered container!
## Kitchen Wisdom & Success Tips
- Don’t Skip the Resting Time: The resting period is crucial for a smooth dough that rolls out easily.
- Use the Right Temperature for Frying: Ensure the oil is adequately heated for crispiness. A kitchen thermometer can help maintain consistency.
- Seal with Care: Make sure the edges of the dough are well-sealed to prevent the shells from bursting during frying.
- Experiment with Flavors: Add a dash of almond extract or a sprinkle of cocoa powder into the dough for a unique twist.
## Flavor Variations & Adaptations
- Chocolate Cannoli: Add cocoa powder to the dough for a chocolate shell and fill with chocolate ricotta cream.
- Lemon Zest: Brighten things up by adding lemon zest to your dough or filling for a refreshing taste.
- Nutty Twist: Mix finely chopped pistachios into the filling for a delightful crunch and flavor profile.
## Reader Questions & Solutions
-
Can I make the dough ahead of time?
Absolutely! Just keep it wrapped tightly in plastic in the fridge for up to 24 hours. -
What if I don’t have cannoli tubes?
You can use homemade tubes from aluminum foil rolled into a cylinder shape or even cut empty paper towel rolls wrapped in foil. -
Can I bake instead of fry?
Yes, if you prefer a healthier option! Brush the rolled shells with egg wash and bake at 375°F (190°C) for about 15 minutes until golden. -
What can I fill them with besides ricotta?
Explore options like mascarpone, whipped cream cheese, or even custard. Your creativity is the limit! -
Why did my shells come out chewy?
This usually happens if they are overworked or fried at too low a temperature. Ensuring a hot oil temperature is vital for that crunchy texture.
## Wrapping Up
Homemade cannoli shells are more than just a dessert—they’re a celebration of flavor, nostalgia, and the joy of cooking. Gathering friends and family around the table to indulge in these crispy treats brings people together. So go on, gather your ingredients, and let your kitchen fill with the glorious aroma of frying pastry. Enjoy every moment of this delicious journey and celebrate the sweet success that will surely follow!
PrintHomemade Cannoli Shells
Craft delicious homemade cannoli shells that are light, crispy, and perfect for filling with sweet ricotta.
- Prep Time: 30 minutes
- Cook Time: 20 minutes
- Total Time: 60 minutes
- Yield: 10-12 shells 1x
- Category: Dessert
- Method: Frying
- Cuisine: Italian
- Diet: Vegetarian
Ingredients
- 1 cup all-purpose flour
- 2 tablespoons granulated sugar
- 1/2 teaspoon ground cinnamon
- 1/4 teaspoon salt
- 1 tablespoon unsalted butter, softened
- 1 egg
- 1 tablespoon white wine or Marsala
- Oil for frying
Instructions
- Combine dry ingredients in a bowl: the flour, sugar, ground cinnamon, and salt.
- Add softened butter, egg, and white wine to the dry mixture and knead until smooth.
- Wrap the dough tightly in plastic and let it rest for at least 30 minutes.
- Flour your work surface lightly and roll out the rested dough until it’s thin—about 1/8 inch thick.
- Using a round cutter, cut the rolled dough into circles, aiming for about 3-4 inches in diameter.
- Gently wrap each circle around a cannoli tube, sealing the edges with water or egg wash.
- Heat oil to 350°F (175°C) and fry the shaped shells until golden brown, about 2-3 minutes on each side.
- Once golden, carefully remove the shells and drain them on paper towels. Allow cooling before filling.
Notes
Fill cannoli shells just before serving to maintain crispiness. Leftover filling can last up to a week in the fridge.
Nutrition
- Serving Size: 1 shell
- Calories: 90
- Sugar: 1g
- Sodium: 30mg
- Fat: 4g
- Saturated Fat: 1g
- Unsaturated Fat: 3g
- Trans Fat: 0g
- Carbohydrates: 10g
- Fiber: 0g
- Protein: 2g
- Cholesterol: 30mg