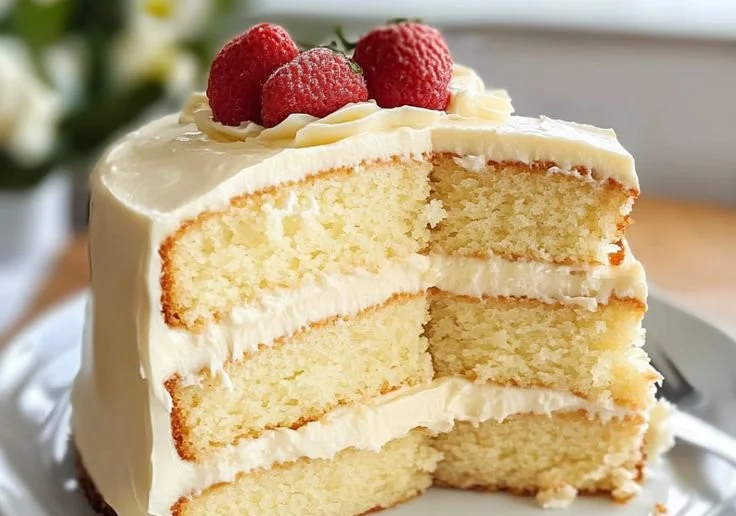
There’s something undeniably enchanting about the act of baking—a celebration of simple ingredients transforming under the warmth of the oven into something marvelous. As I stood in my kitchen, the aroma of butter and vanilla enveloped me like the warm embrace of an old friend. I couldn’t help but reminisce about the countless times my grandmother and I baked together, dancing around her vintage kitchen as laughter filled the air, accompanied by the delightful sound of a mixer whirring. It was in those moments that my love for baking truly blossomed. Today, I want to share with you my cherished Moist Homemade Vanilla Cake Recipe, a cake that has become a staple in my home and a favorite with friends and family alike.
Recipe Timing
- Prep Duration: 30 minutes
- Active Cooking: 30 minutes
- Total Duration: 1 hour
- Portion Size: Serves 12-15
- Complexity: Moderate
Nutritional Recipe
- Calories per portion: Approximately 400
- Protein: 3g
- Carbs: 63g
- Fats: 17g
- Fiber: 0g
- Sugars: 36g
- Sodium: 180mg
Why You’ll Love This Moist Homemade Vanilla Cake Recipe
This isn’t just any vanilla cake; it’s a celebration of flavor and texture. Picture this: a fluffy, tender crumb melting in your mouth, perfectly sweetened with the warm notes of pure vanilla. Each bite is like a hug from a loved one, and, let’s be honest, who doesn’t want that? Plus, the cake’s moisture—thanks to secret ingredients like vegetable oil and sour cream—ensures it stays delightful for days, making it perfect for any occasion. Whether it’s a birthday, an afternoon tea, or simply a Tuesday that needs a little sweetness, this cake fits the bill beautifully.
The Complete Cooking Journey
Baking this delightful cake is not just a recipe; it’s an experience. From gathering your ingredients to the first bite out of the oven, every step is filled with anticipation. Let’s roll up our sleeves and bake this cake together!
Ingredients:
- 3 cups all-purpose flour (don’t use self-rising – and for the love of all things sweet, please fluff and spoon it into measuring cups, don’t scoop!)
- 1 tablespoon baking powder (check the expiration date – old baking powder = flat sad cake)
- 1/2 teaspoon baking soda
- 1 teaspoon salt (don’t skip this!)
- 1 cup unsalted butter, softened (that’s 2 sticks – leave them out for at least an hour)
- 2 cups granulated sugar
- 4 large eggs, room temperature (seriously, room temp matters – cold eggs = lumpy batter)
- 1 tablespoon pure vanilla extract (the good stuff, not the imitation garbage)
- 1 vanilla bean, seeds scraped (optional but AMAZING if you can swing it)
- 1 cup buttermilk, room temperature (no buttermilk? Add 1 tbsp lemon juice or vinegar to regular milk and let sit 5 minutes)
- 1/4 cup vegetable oil (the secret to that ridiculous moisture)
- 1/4 cup sour cream (another moisture miracle worker)
- 1 1/2 cups unsalted butter, softened (for frosting)
- 5-6 cups powdered sugar (depends how sweet you like it)
- 1/4 cup heavy cream
- 2 teaspoons pure vanilla extract (for frosting)
- Pinch of salt (brings out the flavor, trust me)
Method:
Step 1: Preheat and Prepare
Preheat your oven to 350°F (175°C). Grease and flour two 9-inch round cake pans. This ensures your cakes release beautifully.
Step 2: Whisk Dry Ingredients
In a medium bowl, whisk together the all-purpose flour, baking powder, baking soda, and salt. Set this aside—this step might seem small, but it’s vital for the perfect cake!
Step 3: Cream Butter and Sugar
In a large mixing bowl, cream the softened butter and granulated sugar together until pale and fluffy, about 5 minutes. This airiness is what makes your cake light and irresistibly moist!
Step 4: Add Eggs One by One
Add the eggs one at a time, mixing well after each addition. Make sure each egg is fully incorporated before adding the next; this builds that beautiful structure of your cake.
Step 5: Mix in Vanilla
Stir in the vanilla extract and scraped vanilla bean seeds if you’re using them. Ah, the fragrance truly elevates the whole process!
Step 6: Combine with Dry Ingredients
Alternating, add the dry ingredient mixture and the buttermilk to the butter mixture, starting and ending with the flour. Mix slowly; you want to keep that volume, not mash it down!
Step 7: Add Oils for Moisture
Blend in the vegetable oil and sour cream until fully combined. Your batter will be luscious and shiny.
Step 8: Pour and Bake
Divide the batter evenly between the prepared pans. Bake for 25-30 minutes, or until a toothpick inserted into the center comes out clean. Try not to open the oven door too often; we want to keep the heat in!
Step 9: Cool the Cakes
Once baked, let the cakes cool in the pans for about 10 minutes before transferring them onto a wire rack. Allow them to cool completely before frosting—it’s tough but necessary!
Step 10: Make the Frosting
In a mixing bowl, combine the softened butter and 4 cups of powdered sugar. Add the heavy cream, vanilla extract, and pinch of salt. Beat until smooth and creamy, adding more powdered sugar if necessary for sweetness.
Step 11: Assemble and Frost
Once the cakes are cool, place one layer on a serving plate. Spread a generous amount of frosting on top. Gently place the second layer on top and frost the top and sides. Add any decorative touches you prefer!
Step 12: Serve and Enjoy
Slice, serve, and savor each bite of this moist homemade vanilla cake. It’s perfect as is or alongside a scoop of vanilla ice cream for that extra indulgence!
Serving Suggestions & Pairings
This cake pairs wonderfully with fresh berries, a drizzle of chocolate sauce, or even a scoop of vanilla ice cream. It’s also delightful with a cup of tea or coffee—perfect for afternoon gatherings or celebrations.
Storage & Leftovers Guide
Store any leftovers in an airtight container at room temperature for up to 3 days. If you want it to last longer, wrap it well and refrigerate for up to a week. You can also freeze the cake (either whole or in slices) for up to 3 months—just make sure it’s well wrapped!
Kitchen Wisdom & Success Tips
- Make sure all ingredients are at room temperature for the best results.
- Avoid over-mixing once the flour is added; gentle folding will keep the batter airy.
- Always check your baking powder’s expiration date for a successful rise.
- Experiment with flavors! You can add lemon zest or almond extract for a unique twist.
Flavor Variations & Adaptations
Feel free to get creative! Add chocolate chips for a delightful twist or incorporate citrus zest for a fresh take. You can substitute the buttercream frosting with a cream cheese frosting for a tangy flavor that pairs beautifully with the sweetness of the cake.
Reader Questions & Solutions
-
Q: Why is my cake flat?
A: Ensure your baking powder is fresh and don’t skip the leavening agents! -
Q: My cake is too dry! How do I fix it?
A: Check that you’re measuring flour correctly. Too much flour could lead to dryness. -
Q: Can I make this gluten-free?
A: Yes! Substitute the all-purpose flour with a 1:1 gluten-free baking blend. -
Q: My frosting is too runny; how can I thicken it?
A: Gradually add more powdered sugar until you reach your desired consistency. -
Q: What’s the best way to add flavor?
A: Adding pure extracts or incorporate fruit purees, like raspberry or mango, into your batter or frosting for a fruity kick.
Wrapping Up
Bake this Moist Homemade Vanilla Cake and savor those moments of joy it brings, whether shared with loved ones or enjoyed during a quiet afternoon. Embrace the process, have fun, and remember—it’s not just about the cake; it’s about the love and memories made along the way. Happy baking!
PrintMoist Homemade Vanilla Cake

A delightful and moist vanilla cake that melts in your mouth, perfect for any occasion.
- Prep Time: 30 minutes
- Cook Time: 30 minutes
- Total Time: 60 minutes
- Yield: 12-15 servings 1x
- Category: Dessert
- Method: Baking
- Cuisine: American
- Diet: Vegetarian
Ingredients
- 3 cups all-purpose flour
- 1 tablespoon baking powder
- 1/2 teaspoon baking soda
- 1 teaspoon salt
- 1 cup unsalted butter, softened
- 2 cups granulated sugar
- 4 large eggs, room temperature
- 1 tablespoon pure vanilla extract
- 1 vanilla bean, seeds scraped (optional)
- 1 cup buttermilk, room temperature
- 1/4 cup vegetable oil
- 1/4 cup sour cream
- 1 1/2 cups unsalted butter, softened (for frosting)
- 5–6 cups powdered sugar
- 1/4 cup heavy cream
- 2 teaspoons pure vanilla extract (for frosting)
- Pinch of salt
Instructions
- Preheat your oven to 350°F (175°C) and prepare two 9-inch round cake pans.
- Whisk together the flour, baking powder, baking soda, and salt in a medium bowl.
- Cream the butter and sugar together until pale and fluffy.
- Add the eggs one at a time, making sure each is fully incorporated.
- Mix in the vanilla extract and vanilla bean seeds, if using.
- Combine the dry ingredients and buttermilk alternately with the butter mixture.
- Blend in the vegetable oil and sour cream until fully combined.
- Pour the batter evenly into the prepared pans and bake for 25-30 minutes.
- Cool the cakes in pans for 10 minutes before transferring to a wire rack to cool completely.
- Make the frosting by combining softened butter and powdered sugar, then add cream, vanilla, and salt until smooth.
- Assemble and frost the cooled cakes, decorating as desired.
- Serve and enjoy with loved ones or on your own.
Notes
For best results, ensure all ingredients are at room temperature and avoid over-mixing once the flour is added.
Nutrition
- Serving Size: 1 slice
- Calories: 400
- Sugar: 36g
- Sodium: 180mg
- Fat: 17g
- Saturated Fat: 10g
- Unsaturated Fat: 7g
- Trans Fat: 0g
- Carbohydrates: 63g
- Fiber: 0g
- Protein: 3g
- Cholesterol: 110mg