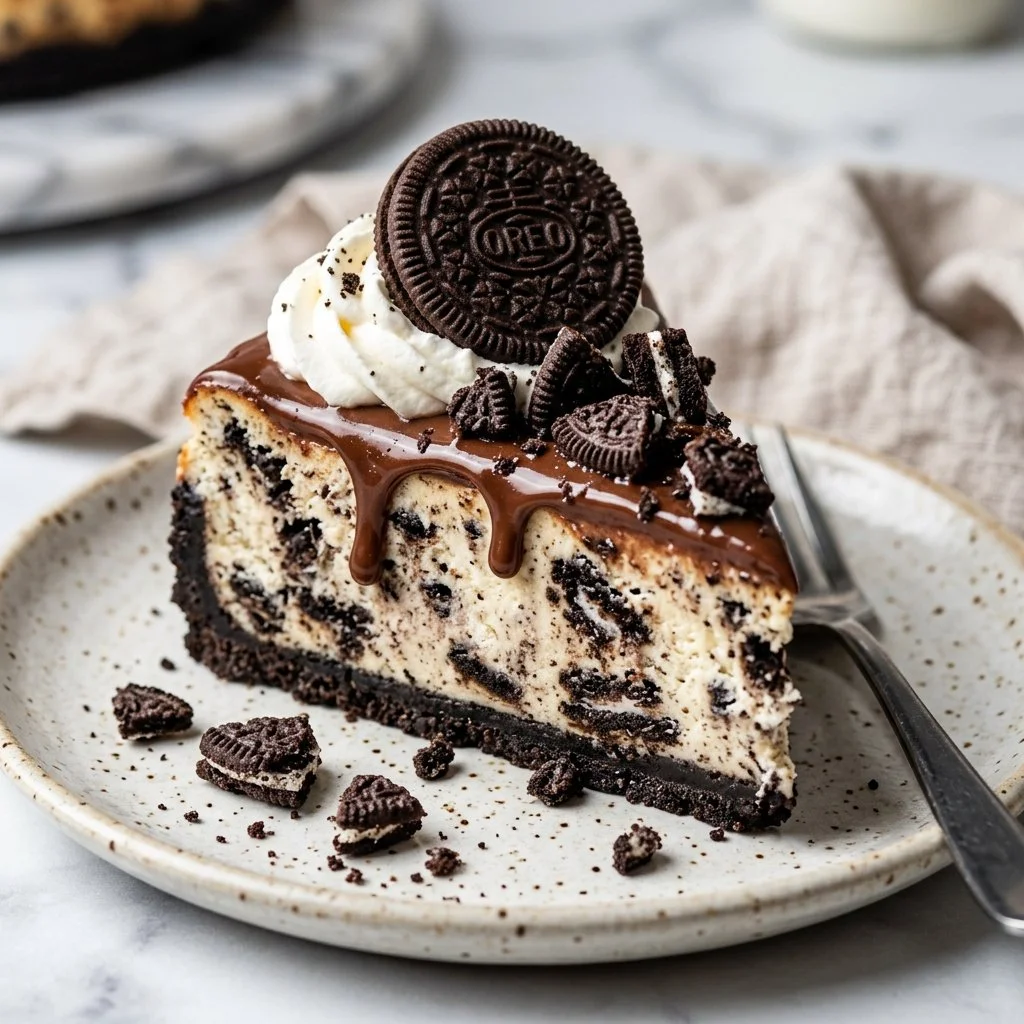
There’s something truly magical about stepping into your kitchen and having the promise of a delectable dessert come together right before your eyes. For me, the ultimate representative of this magic is none other than the Oreo Cheesecake. It’s a dessert that transcends mere sweetness; it’s a nostalgia trip edged with a sumptuous creaminess and the perfect crunch of crushed cookies. When I think about the times I’ve gathered with friends and family—laughter echoing in the air—this cheesecake has always been the star of the show.
As I prepare to share this recipe with you, I can almost hear the crunch of those Oreos as they mix with the creamy decadence of the cheesecake. Let me take you on a flavorful journey that brings a slice of joy into your life.
Recipe Timing
- Prep Duration: 20 minutes
- Active Cooking: 1 hour
- Total Duration: 5 hours (including refrigeration)
- Portion Size: 12 slices
- Complexity: Simple
Nutritional Recipe
- Calories per portion: Approximately 480 calories
- Protein: 8 grams
- Carbs: 43 grams
- Fats: 34 grams
- Fiber: 1 gram
- Sugars: 28 grams
- Sodium: 290 mg
Why You’ll Love This Oreo Cheesecake
This Oreo Cheesecake is not just any dessert; it’s rich, creamy, and above all, it’s a crowd-pleaser. The combination of the buttery Oreo crust and the smooth cream cheese filling makes every bite a delightful experience. Plus, the whipped cream topping and chopped Oreos sprinkle a little extra magic on top. Perfect for birthdays, holidays, or just a regular Tuesday when you want to treat yourself, this cheesecake is straightforward enough to whip up and impressive enough to wow your guests.
The Complete Cooking Journey
As we embark on this culinary journey, I encourage you to savor each step. The aroma of the baking cheesecake wafting through your home, the thrill of whipping the cream to stiff peaks—these moments are just as important as the final product. So roll up your sleeves, put on your favorite music, and let’s make some magic happen!
Ingredients:
- 2 cups Oreo cookie crumbs
- 1/2 cup unsalted butter, melted
- 4 (8 oz) packages cream cheese, softened
- 1 cup granulated sugar
- 1 teaspoon vanilla extract
- 4 large eggs
- 2 cups heavy cream
- 3/4 cup powdered sugar
- 10 Oreo cookies, chopped (for topping)
Method:
Step 1: Preheat the Oven
Preheat the oven to 325°F (160°C) to create the ideal environment for your cheesecake.
Step 2: Make the Cookie Crust
In a bowl, mix Oreo cookie crumbs and melted butter until well combined. Press this mixture firmly into the bottom of a springform pan to form a solid crust.
Step 3: Combine Cream Cheese and Sugar
In a large mixing bowl, beat together cream cheese, granulated sugar, and vanilla extract until the mixture is smooth and creamy.
Step 4: Incorporate the Eggs
Add the eggs to the cream cheese mixture one at a time, mixing well after each addition to ensure everything is well blended.
Step 5: Pour the Mixture
Pour the cream cheese mixture over the prepared crust in the springform pan, spreading it evenly.
Step 6: Bake the Cheesecake
Bake for 55-60 minutes or until the center is set but still slightly jiggly. Trust your oven’s timing and keep a close eye!
Step 7: Cooling the Cheesecake
Once baked, let the cheesecake cool to room temperature. Then refrigerate for at least 4 hours or, for the best taste, overnight. Patience is key!
Step 8: Whip the Cream
In another bowl, whip together the heavy cream and powdered sugar until stiff peaks form—this will make a luscious topping for the cheesecake.
Step 9: Garnish with Cream and Cookies
Spread the whipped cream over the chilled cheesecake and generously top with chopped Oreo cookies for that perfect finishing touch.
Step 10: Serve and Enjoy!
Slice the cheesecake and serve. Watch as everyone’s eyes light up with joy—each bite is a little celebration!
Serving Suggestions & Pairings
This indulgent cheesecake pairs beautifully with fresh berries or a drizzle of chocolate sauce. Consider serving it alongside a cup of coffee or a scoop of vanilla ice cream to elevate the dessert experience.
Storage & Leftovers Guide
Cover any leftover cheesecake tightly and store it in the refrigerator. It’ll stay fresh for about 5-7 days. Trust me, it’s hard to resist, so leftovers might be few and far between!
Kitchen Wisdom & Success Tips
- Room Temperature Ingredients: Ensure your cream cheese is at room temperature for an even, smooth batter.
- Don’t Overmix: Once you add the eggs, mix just until combined to avoid incorporating too much air.
- Chill Well: Allowing your cheesecake to chill overnight enhances its flavor and texture.
Flavor Variations & Adaptations
Feel free to swap out regular Oreos for different flavored cookies. Mint Oreos lend a refreshing twist while peanut butter Oreos add a deliciously nutty element. You can even mix in chocolate chips or a swirl of peanut butter for extra flair!
Reader Questions & Solutions
-
Why is my cheesecake cracking?
- Cracking typically occurs when the cheesecake is overcooked or baked at too high a temperature. Try baking at a lower temperature and ensure it’s not overmixed.
-
How do I know when my cheesecake is done?
- The center should be set but still jiggle slightly when you move it. It will continue to firm up as it cools.
-
Can I make this cheesecake ahead of time?
- Absolutely! This cheesecake actually tastes better when made a day in advance. Just keep it covered in the fridge.
-
Can I freeze leftovers?
- Yes, you can freeze cheesecake slices for about 2-3 months. Thaw in the fridge before serving.
-
What can I use instead of heavy cream?
- For a lighter option, you can use Greek yogurt or mascarpone cheese, though the texture will be slightly different.
Wrapping Up
Whether for a special occasion or just because you deserve a sweet reward, this Oreo Cheesecake is sure to impress. Each slice tells a story, overflows with flavor, and brings people together. So gather your loved ones, whip out that springform pan, and let this heavenly dessert become a new favorite in your household. Happy baking!
PrintOreo Cheesecake
A rich and creamy Oreo Cheesecake featuring a buttery crust and whipped cream topping, perfect for any occasion.
- Prep Time: 20 minutes
- Cook Time: 60 minutes
- Total Time: 300 minutes
- Yield: 12 servings 1x
- Category: Dessert
- Method: Baking
- Cuisine: American
- Diet: Vegetarian
Ingredients
- 2 cups Oreo cookie crumbs
- 1/2 cup unsalted butter, melted
- 4 (8 oz) packages cream cheese, softened
- 1 cup granulated sugar
- 1 teaspoon vanilla extract
- 4 large eggs
- 2 cups heavy cream
- 3/4 cup powdered sugar
- 10 Oreo cookies, chopped (for topping)
Instructions
- Preheat the oven to 325°F (160°C).
- Mix Oreo cookie crumbs and melted butter until well combined. Press into the bottom of a springform pan.
- Beat together cream cheese, granulated sugar, and vanilla extract until smooth and creamy.
- Add the eggs to the cream cheese mixture one at a time, mixing well after each addition.
- Pour the cream cheese mixture over the prepared crust in the springform pan.
- Bake for 55-60 minutes or until the center is set but still slightly jiggly.
- Let the cheesecake cool to room temperature, then refrigerate for at least 4 hours or overnight.
- Whip the heavy cream and powdered sugar until stiff peaks form for the topping.
- Spread whipped cream over the chilled cheesecake and top with chopped Oreo cookies.
- Slice and serve, enjoying every bite!
Notes
For best flavor, chill overnight. This cheesecake can be made a day ahead.
Nutrition
- Serving Size: 1 slice
- Calories: 480
- Sugar: 28g
- Sodium: 290mg
- Fat: 34g
- Saturated Fat: 21g
- Unsaturated Fat: 13g
- Trans Fat: 0g
- Carbohydrates: 43g
- Fiber: 1g
- Protein: 8g
- Cholesterol: 120mg