It was a balmy summer evening, and the sun was beginning to set, casting a golden glow that danced across our backyard. I could hear the laughter of children playing nearby, the scent of freshly mowed grass wafting through the air, but more enticing was the gentle crackling sound coming from our fire pit. As a family, we’ve always cherished our bonfire nights—gathering around to roast marshmallows, tell stories, and indulge in the classic treat of s’mores. However, as delicious as those gooey delights are, sometimes you just want to capture that iconic flavor in a more manageable, shareable form. That, my friends, is where S’mores Bars come into play.
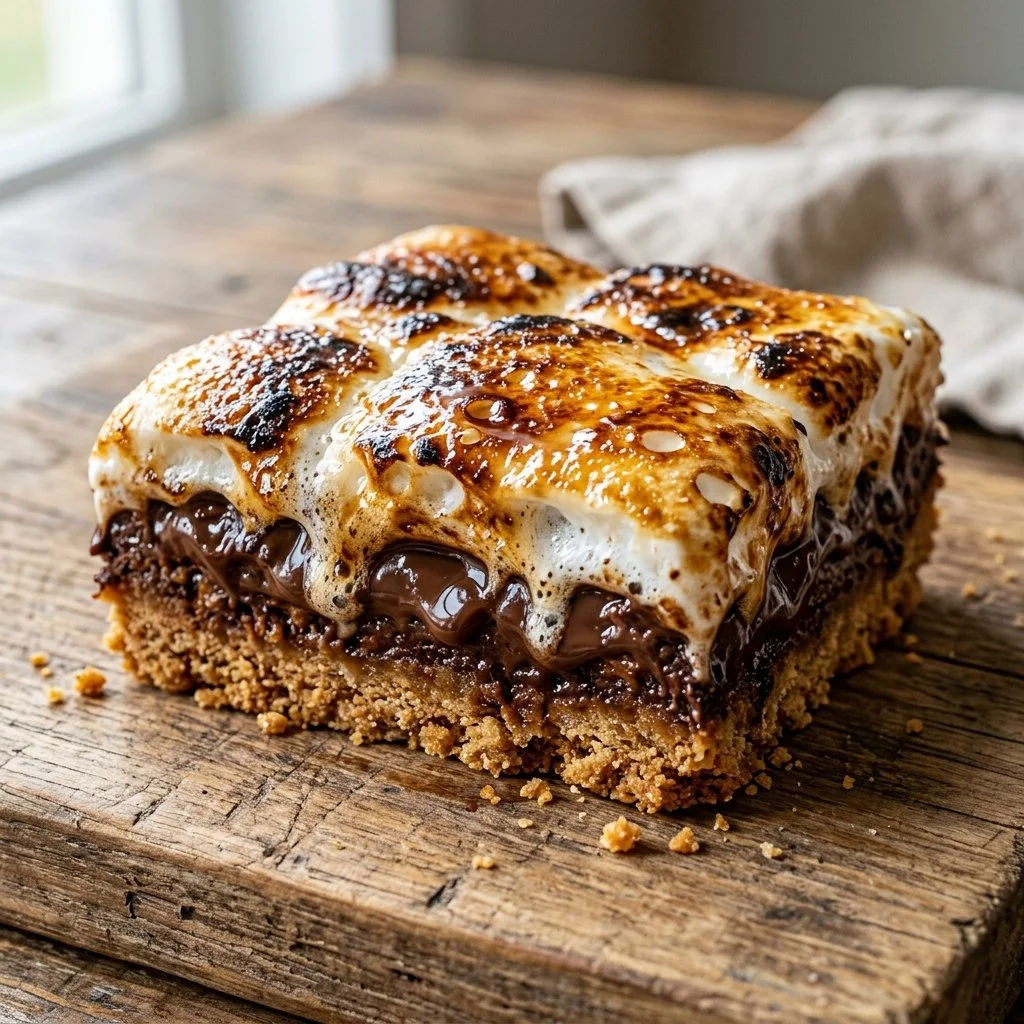
These bars combine all the nostalgic flavors of classic s’mores—sweet chocolate, fluffy marshmallow, and the unique crunch of graham crackers—into an easy, bake-at-home treat. Whether you’re planning an outdoor gathering, a simple family dessert, or a special indulgence for yourself, these bars will surely satisfy your craving. Let’s get started on this delightful journey!
Recipe Timing
- Prep Duration: 10 minutes
- Active Cooking: 12 minutes
- Total Duration: 22 minutes
- Portion Size: 16 bars
- Complexity: Simple
Nutritional Recipe
- Calories per portion: Approximately 200
- Protein: 2 grams per serving
- Carbs: 27 grams per serving
- Fats: 10 grams per serving
- Fiber: 1 gram per serving
- Sugars: 13 grams per serving
- Sodium: 105 mg per serving
Why You’ll Love This S’mores Bars
These S’mores Bars offer the ultimate combination of crunchy, sweet, and gooey goodness, all in one bite. They are incredibly quick to prepare, allowing you to satisfy your sweet tooth without spending hours in the kitchen. Perfect for parties or just a cozy night at home, they invite everyone to unwind and savor a nostalgic treat. Plus, who wouldn’t love a dessert that brings back memories of sitting around the fire with family and friends?
The Complete Cooking Journey
Let’s set the stage for your culinary adventure. First, you’ll gather your ingredients, making sure to have everything within arms-reach. Once the oven preheats, the magic truly begins as you combine those crunchy graham cracker crumbs with melted butter and sugar. It’s essential to press this mixture into the baking pan, creating a sturdy foundation for the layers of chocolate and marshmallows that will soon follow. After a brief visit to the oven, your kitchen will be filled with an irresistible aroma that takes you straight back to those wonderful summer nights.
Ingredients:
- 1 cup graham cracker crumbs
- 1/2 cup unsalted butter, melted
- 1/4 cup granulated sugar
- 2 cups chocolate chips
- 2 cups mini marshmallows
Method:
Step 1: Preheat the Oven
Preheat the oven to 350°F (175°C). This ensures a perfect baking environment for your bars.
Step 2: Combine the Crust Ingredients
In a bowl, combine graham cracker crumbs, melted butter, and sugar; mix well until the crumbs are evenly coated.
Step 3: Press into the Baking Pan
Press the mixture into the bottom of a greased 9×9-inch baking pan, creating an even layer. This will be the base of your S’mores Bars.
Step 4: Sprinkle on the Chocolate
Sprinkle chocolate chips evenly over the crust, making sure to cover as much of the surface as possible for that glorious melty goodness.
Step 5: Load with Marshmallows
Top with mini marshmallows, placing them closely together to create a blanket of fluffiness that will bake into a delightful topping.
Step 6: Bake to Perfection
Bake in the preheated oven for 10-12 minutes or until the marshmallows are golden brown and slightly puffed up. This is where the magic happens!
Step 7: Cool and Cut
Allow to cool before cutting into bars and serving. Patience is key here; the bars will hold together better once cooled!
Serving Suggestions & Pairings
These S’mores Bars are fantastic on their own, but they shine even brighter when paired with a scoop of vanilla ice cream or whipped cream. For an extra twist, drizzle some chocolate sauce over the top or serve them alongside fresh berries. They also make a great treat for picnics, late-night snacks, or even as a fun dessert for BBQ gatherings.
Storage & Leftovers Guide
Store any leftover bars in an airtight container at room temperature for up to 3 days. If you want to enjoy them later, you can refrigerate for up to a week. Just make sure to let them come to room temperature before indulging again, as the chocolate will harden in the fridge.
Kitchen Wisdom & Success Tips
- For Extra Flavor: Add a dash of vanilla extract to the crust mixture for an enhanced flavor profile.
- Gooey Factor: If you like your marshmallows extra toasted, you can use a broiler for the last minute of baking. Just keep a close watch!
- Easy Cleanup: Line your baking pan with parchment paper before pressing in the crust to make removing the bars cleaner and simpler.
Flavor Variations & Adaptations
Try adding peanut butter chips or butterscotch chips for a delicious twist. For a healthier option, swap out half of the chocolate chips for dark chocolate or even chopped nuts. Gluten-free graham crackers can also be used to make this treat gluten-free!
Reader Questions & Solutions
-
Can I make these S’mores Bars ahead of time?
Yes! You can bake them a day in advance. Just store them properly, and they’ll be perfect the next day. -
What if I don’t have mini marshmallows?
You can cut regular marshmallows into quarters; just make sure to space them out evenly. -
Can I use different kinds of chocolate?
Absolutely! Dark chocolate or milk chocolate work wonderfully, or you can experiment with flavored chocolate for something unique. -
How do I know when they are done baking?
Look for golden-brown marshmallows—this indicates they are perfectly baked. -
What should I do if the bars crumble when I cut them?
Ensure they are completely cool before cutting. You can also chill them in the refrigerator for easier slicing.
Wrapping Up
These S’mores Bars are not just a recipe; they’re a celebration of flavor, nostalgia, and community. Whether you’re sharing them with friends or keeping them all for yourself (I won’t judge!), you will relish every chewy, crunchy, and chocolaty bite. I hope you enjoy making them as much as I enjoyed sharing this recipe with you. Happy baking!